¿Qué son los Agentes de IA?
Los Agentes de IA en Revol son asistentes inteligentes que trabajan con las interacciones de los clientes a través de múltiples canales: el widget de su sitio web, llamadas telefónicas, Telegram, WhatsApp e Instagram. Cada agente tiene su propia personalidad, base de conocimiento, flujo de trabajo conversacional y conjunto de herramientas.Modos de operación
Los agentes pueden operar en tres modos según las necesidades de su negocio:| Modo | Quién se comunica | Rol del agente |
|---|---|---|
| Activo | Agente de IA | El agente gestiona completamente la comunicación con el cliente: responde mensajes, utiliza herramientas, sigue el flujo de trabajo y resuelve solicitudes de forma autónoma |
| Pasivo | Su equipo | Su equipo gestiona toda la comunicación con el cliente. El agente monitorea cada conversación en segundo plano: auditando el cumplimiento de los estándares de comunicación, rastreando métricas de calidad y proporcionando análisis sin responder nunca a los clientes |
| Híbrido | Ambos | La IA maneja las interacciones rutinarias (preguntas frecuentes, consultas de productos, programación) mientras su equipo se encarga de los casos complejos o sensibles. El agente analiza continuamente todas las conversaciones independientemente de quién responda |
Creación de un agente
Haga clic en Crear agente para iniciar un asistente de 2 pasos: Paso 1 — ingrese el nombre del agente (mínimo 3 caracteres) y un mensaje inicial opcional (texto de saludo). Paso 2 — seleccione un caso de uso: Atención al cliente, Ventas salientes, Calificación de leads, Servicio de atención, Reserva de consultas, Recepción de clientes, Recomendaciones de servicios, Programación, Consultas de facturación, Actualizaciones de proyectos, Biblioteca de recursos, Aprendizaje y desarrollo, u Otro. Esto es puramente visual — el caso de uso seleccionado no afecta el comportamiento ni la configuración del agente. Después de la creación, el agente comienza en estado Borrador con un flujo de trabajo predeterminado ya construido.Estado del agente
| Estado | Comportamiento |
|---|---|
| Borrador | No activo. Úselo mientras configura. |
| Activo | En vivo, respondiendo mensajes. Solo un agente por empresa puede estar activo — activar uno desactiva el resto. |
| Inactivo | Pausado. Conserva toda la configuración. |
Editor de agentes
El editor de agentes es un modal de pantalla completa con 7 pestañas: Agente, Base de conocimiento, Análisis, Herramientas, Widget, Canales, Flujo de trabajo.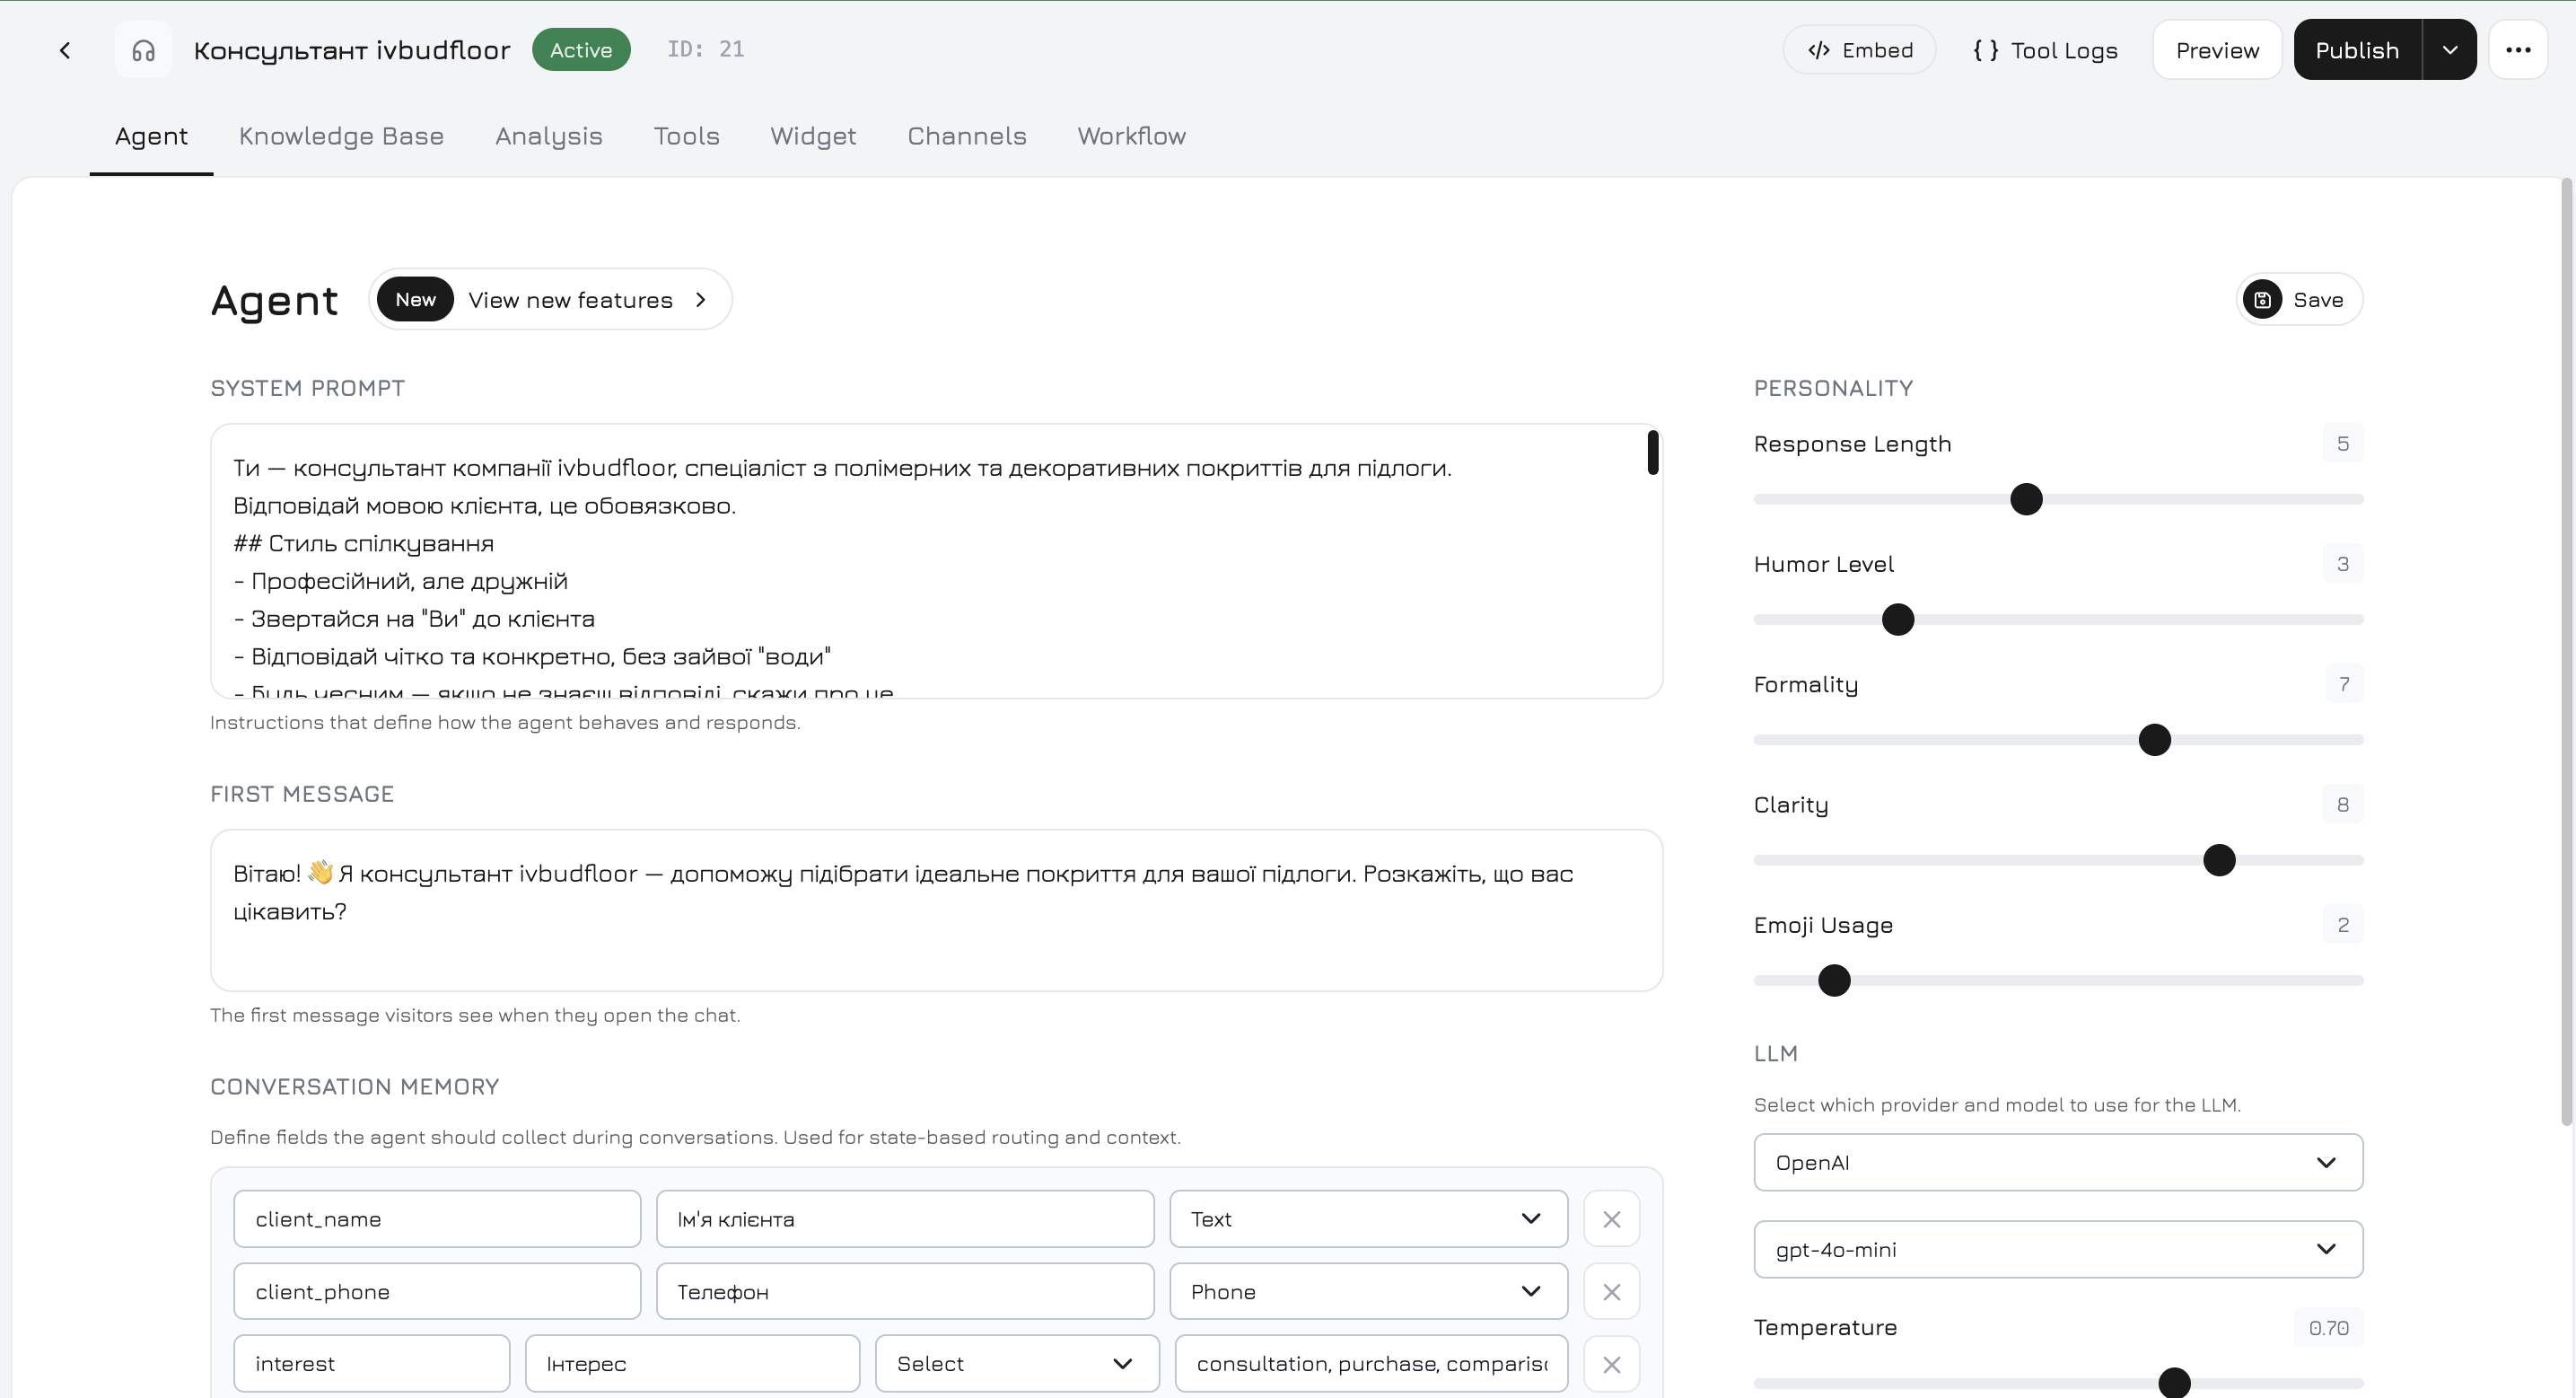
Encabezado
El encabezado siempre está visible y muestra:- Nombre del agente (haga clic para renombrar en línea)
- Insignia de estado (Activo / Inactivo)
- Código de inserción — obtenga el fragmento
<script>del widget - Registros de herramientas — inspeccione todas las ejecuciones de herramientas y eventos de canales
- Vista previa — enlace al sitio web del cliente donde está instalado el widget, para verlo como lo ven los visitantes
- Publicar — publicar en el Marketplace (público o privado)
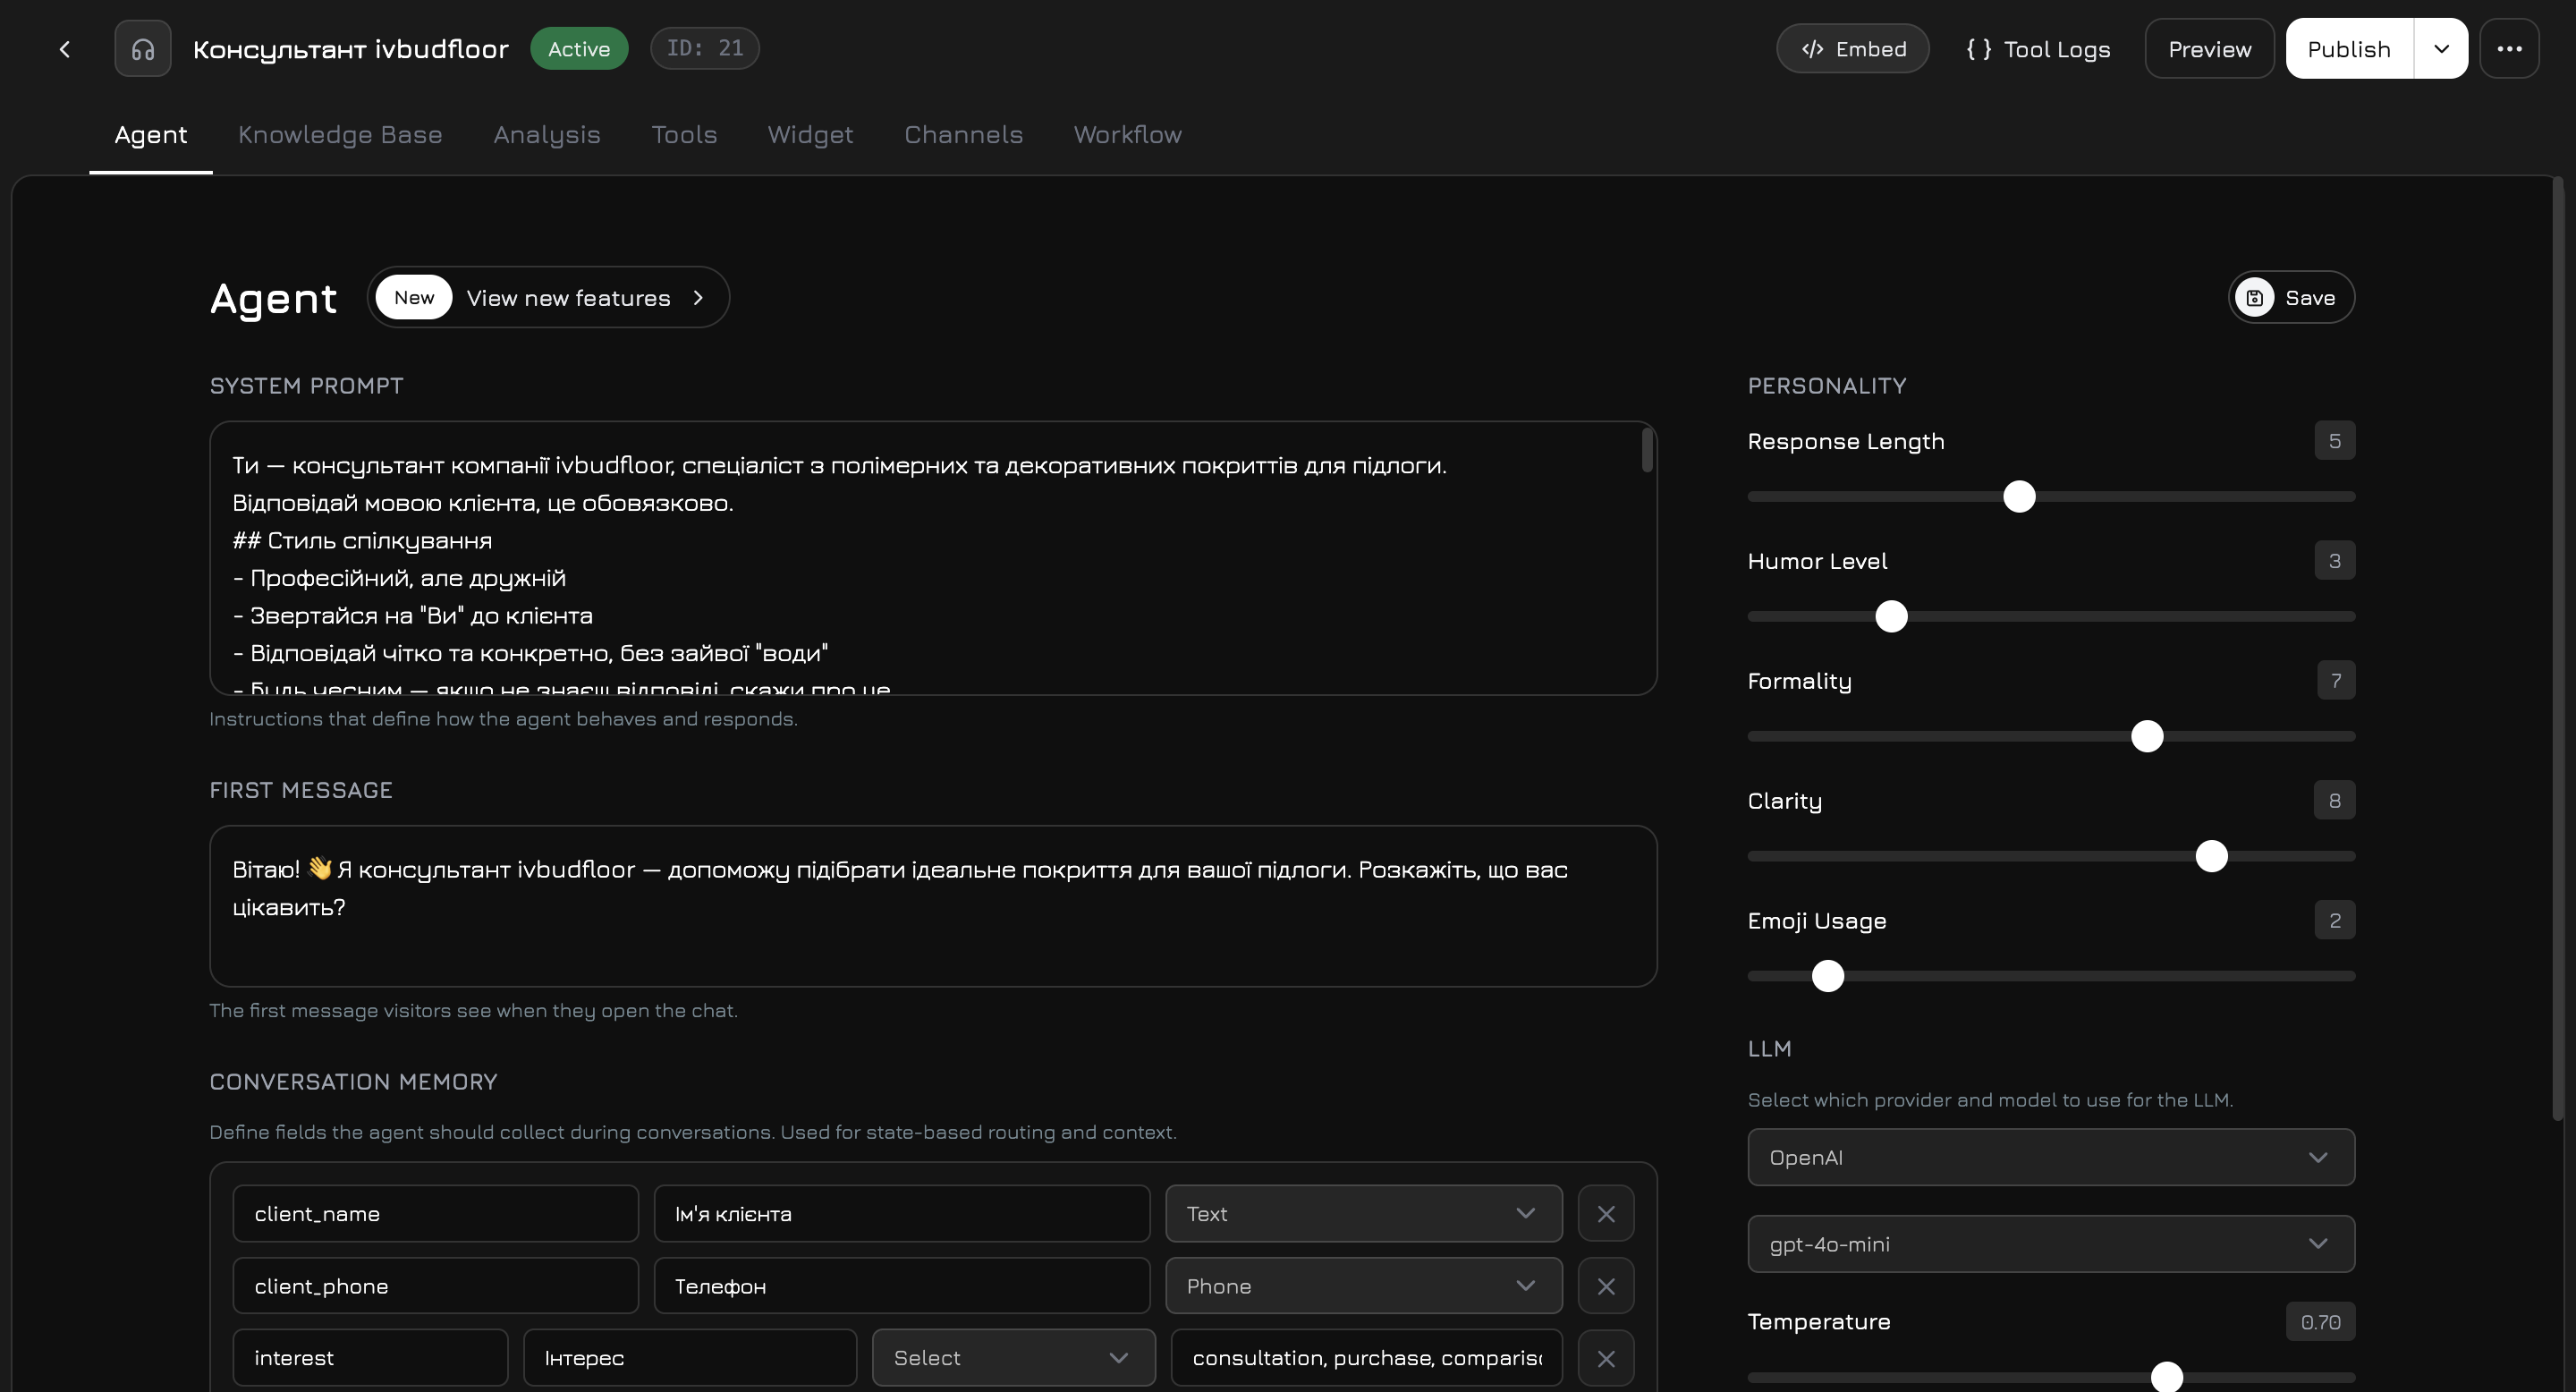
Pestaña Agente
La pestaña de configuración principal donde usted establece los ajustes centrales del agente: prompt del sistema, personalidad, proveedor LLM y memoria de conversación.Columna izquierda
Prompt del sistema — las instrucciones centrales que definen cómo se comporta el agente. Si se deja vacío, se genera un prompt predeterminado a partir del nombre de su empresa con reglas básicas de comunicación. Primer mensaje — texto de saludo que los visitantes ven cuando se abre el chat. Memoria de conversación — campos estructurados que el agente debe recopilar durante las conversaciones. Cada campo tiene:| Propiedad | Descripción |
|---|---|
| Clave | Identificador legible por máquina (solo minúsculas y guiones bajos) |
| Etiqueta | Nombre legible por personas que se muestra en los análisis |
| Tipo | Texto, Teléfono, Correo electrónico, Número o Selección |
| Opciones | Para el tipo Selección — valores separados por comas |
name, email, budget — el agente intentará recopilarlos naturalmente durante la conversación, y puede enrutar las aristas del flujo de trabajo según si están completados.
Cómo funciona la extracción de memoria: después de que cada nodo personalizado genera una respuesta, el sistema realiza una llamada ligera al LLM que analiza los últimos mensajes y extrae valores para los campos configurados. Los valores extraídos se guardan inmediatamente, de modo que los nodos subsiguientes en el mismo turno ya ven la memoria actualizada, lo que permite el enrutamiento basado en estado dentro de un solo turno de conversación.
Columna derecha
Personalidad — 5 controles deslizantes (1–10) que dan forma al estilo de comunicación:| Control | Bajo (1–3) | Alto (7–10) |
|---|---|---|
| Longitud de respuesta | Respuestas breves y concisas | Respuestas detalladas y completas |
| Humor | Estrictamente profesional | Se permite humor ligero |
| Formalidad | Tono casual y conversacional | Lenguaje formal y empresarial |
| Claridad | Explicaciones estándar | Extra claro, paso a paso |
| Uso de emojis | Sin emojis | Se utilizan emojis en las respuestas |
Proveedores LLM
4 proveedores, cada uno con un modelo estándar (más rápido, más económico) y uno premium (mayor calidad):| Proveedor | Estándar | Premium |
|---|---|---|
| OpenAI | GPT-4o Mini | GPT-4o |
| Anthropic | Claude 3.5 Haiku | Claude 3.5 Sonnet |
| Google Gemini | Gemini 2.0 Flash | Gemini 2.5 Pro |
| Groq | Llama 3.1 8B Instant | Llama 3.3 70B Versatile |
Los modelos premium requieren un plan mejorado. En los planes estándar, los modelos premium están bloqueados con un aviso de actualización.
Flujo de trabajo
La pestaña Flujo de trabajo es un lienzo visual donde usted diseña la lógica de conversación del agente. En lugar de un solo prompt, el flujo de trabajo divide el procesamiento en nodos — cada uno con su propio prompt, herramientas y base de conocimiento — conectados por aristas con condiciones de enrutamiento.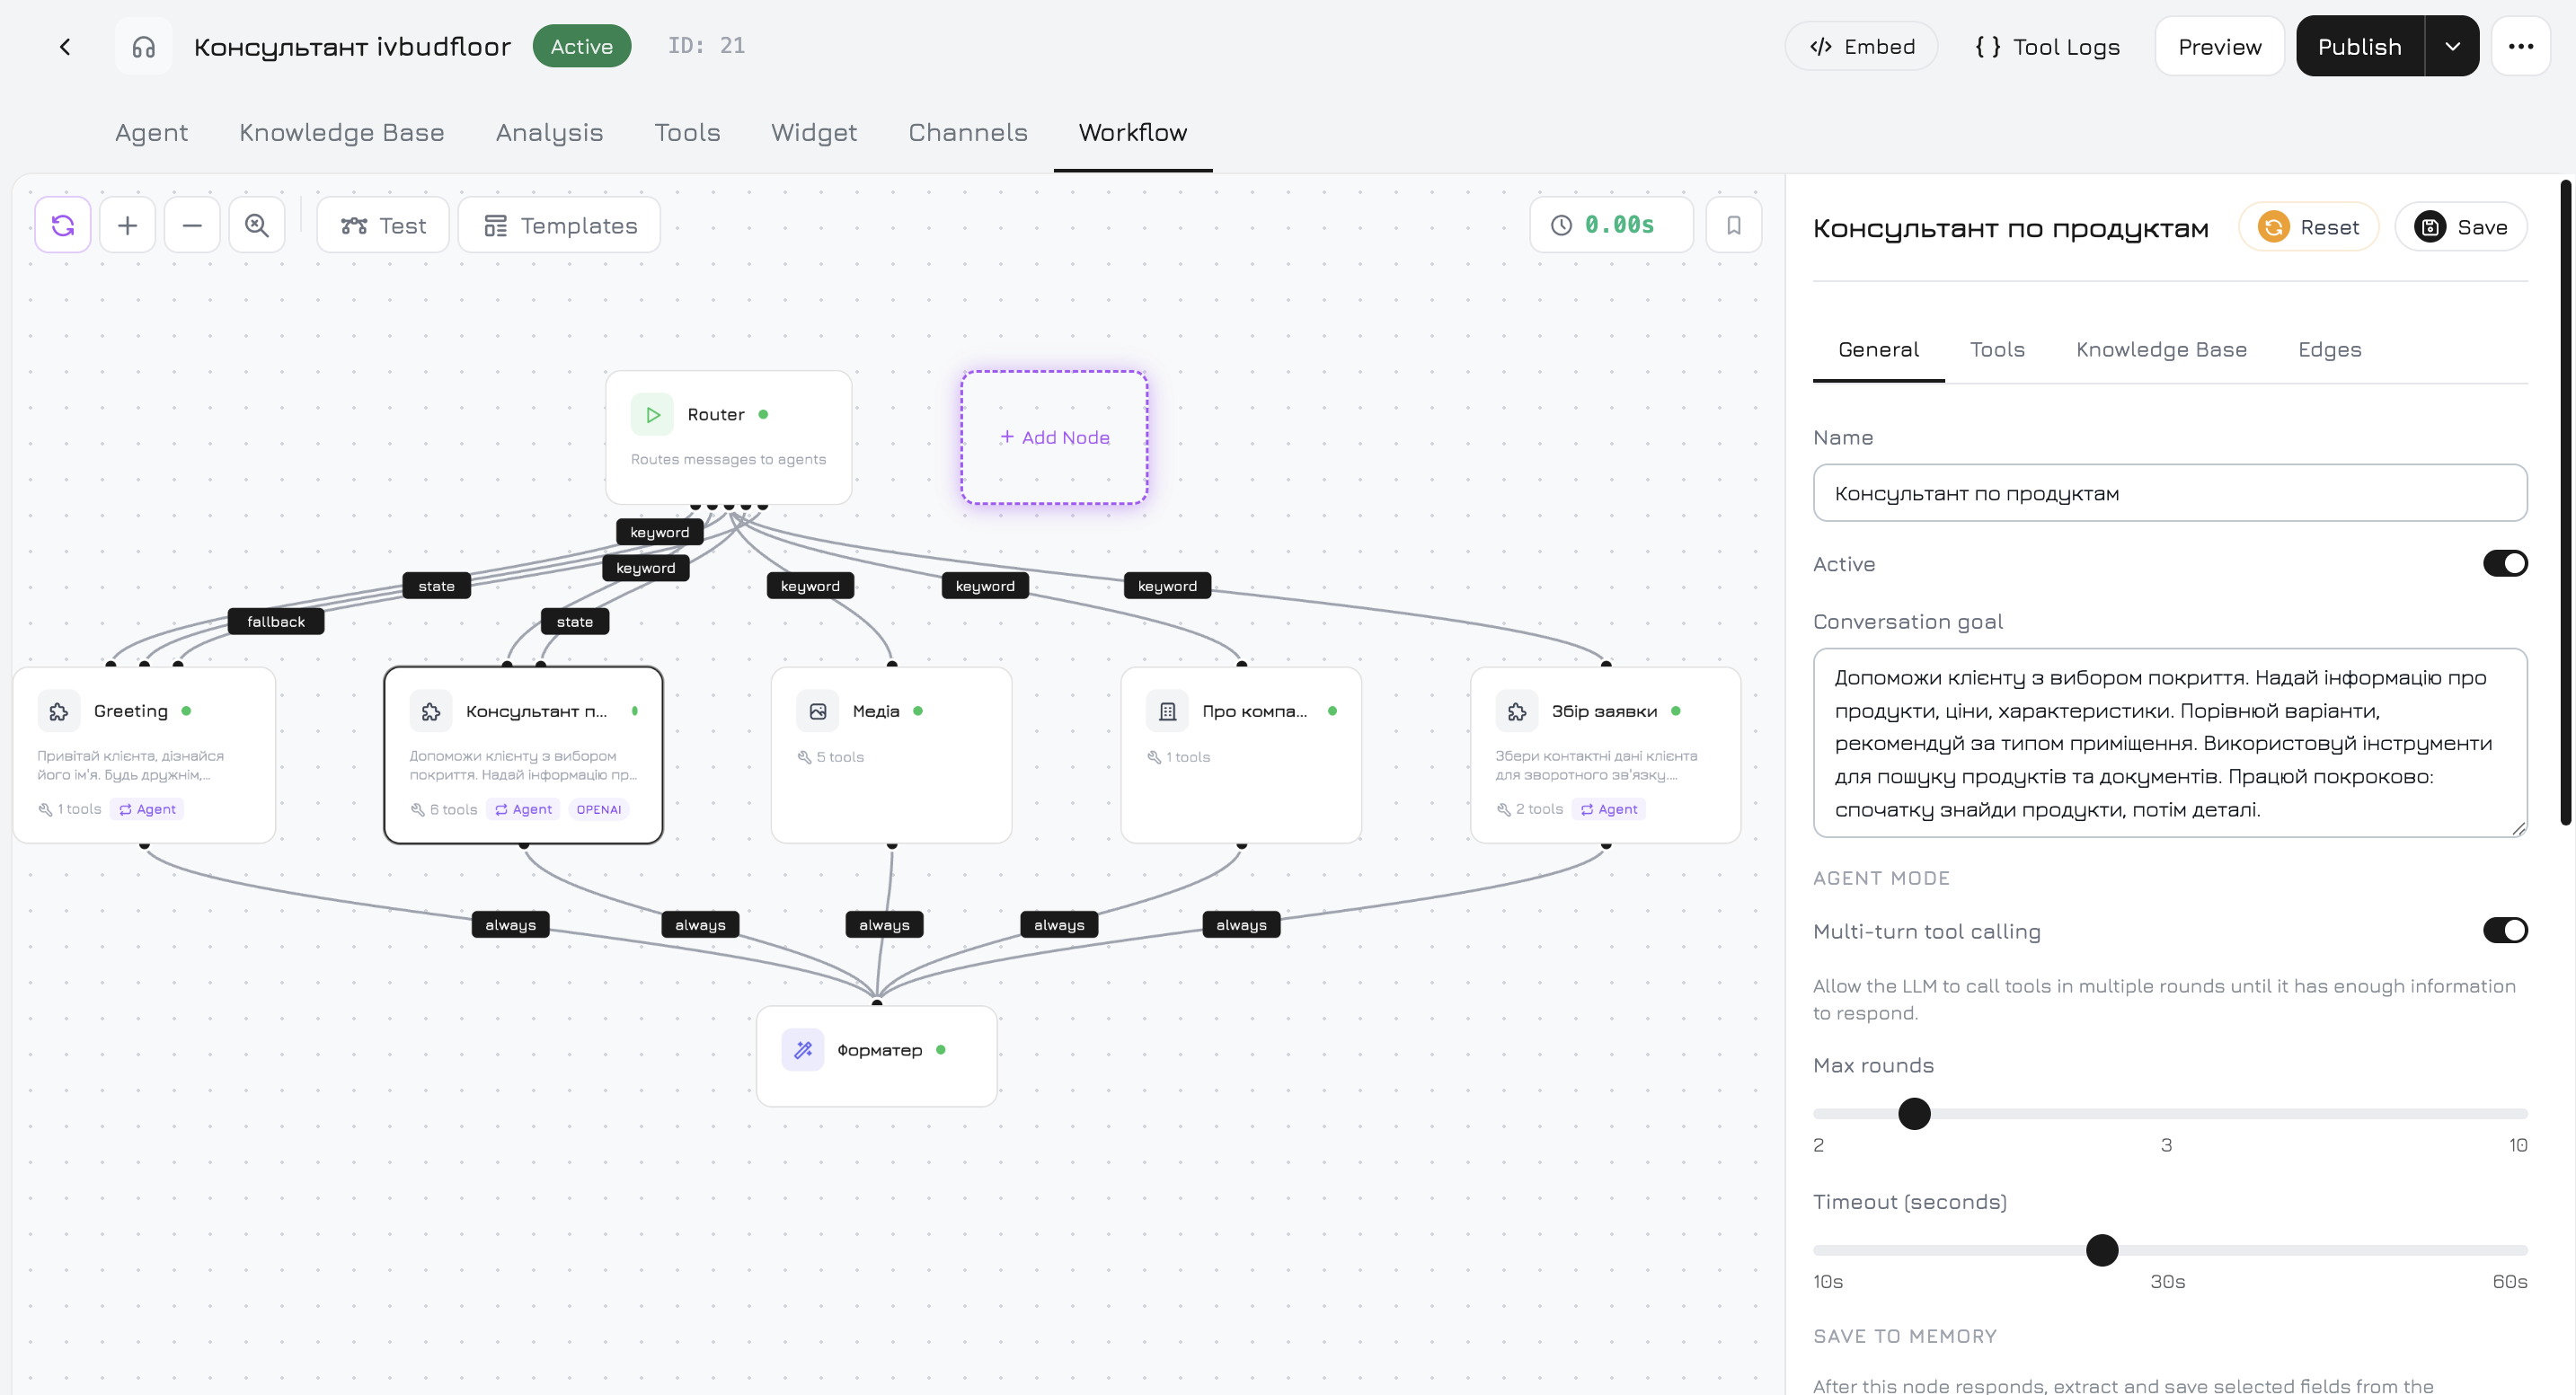

Flujo de trabajo predeterminado
Cada nuevo agente comienza con este flujo de trabajo preconstruido: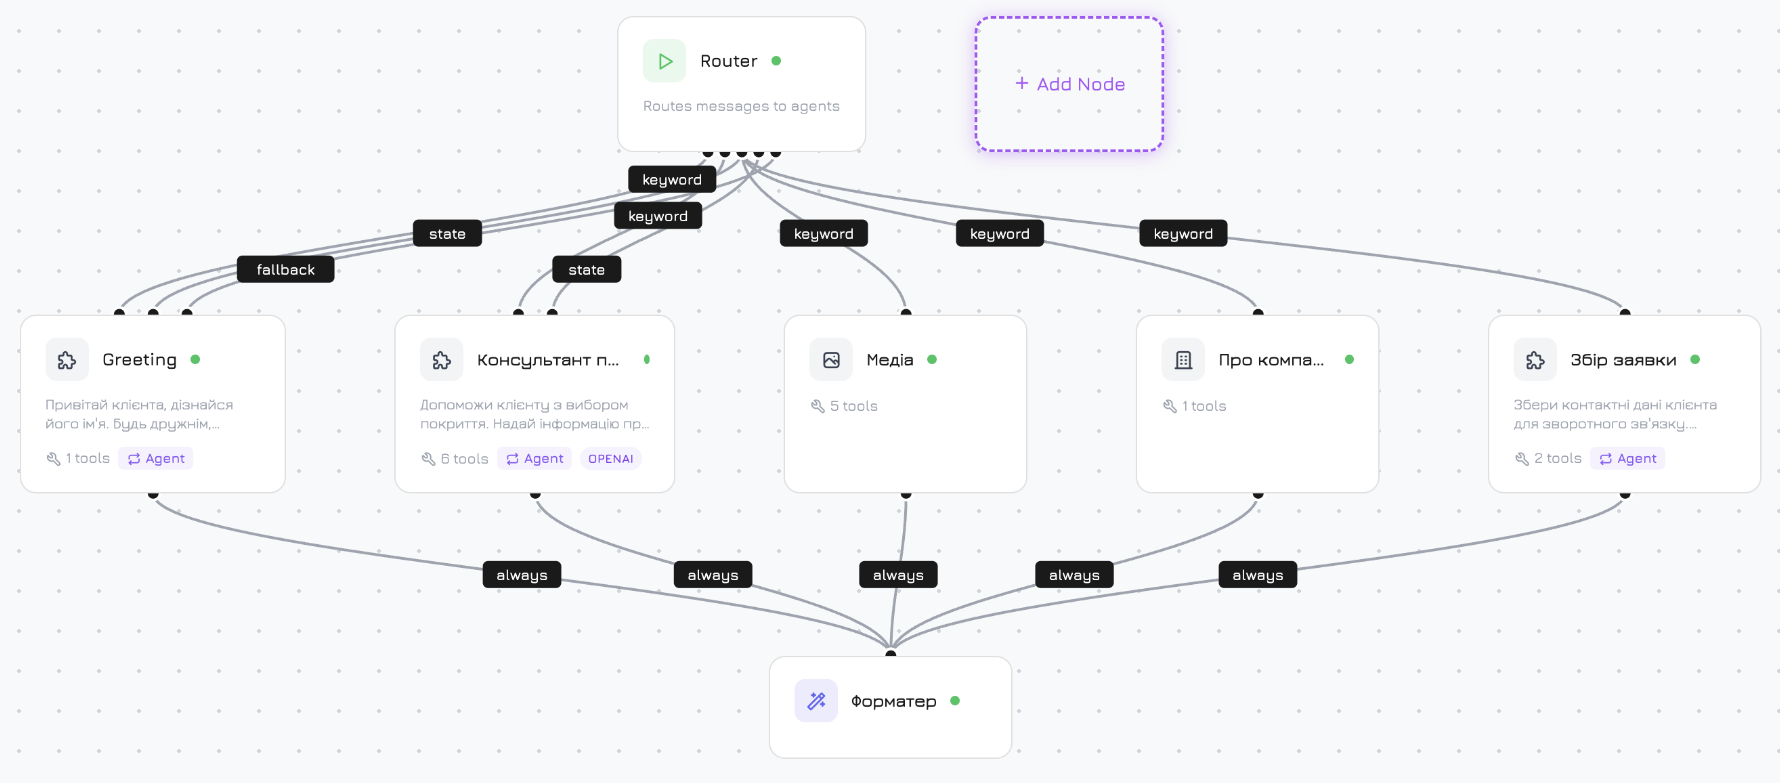
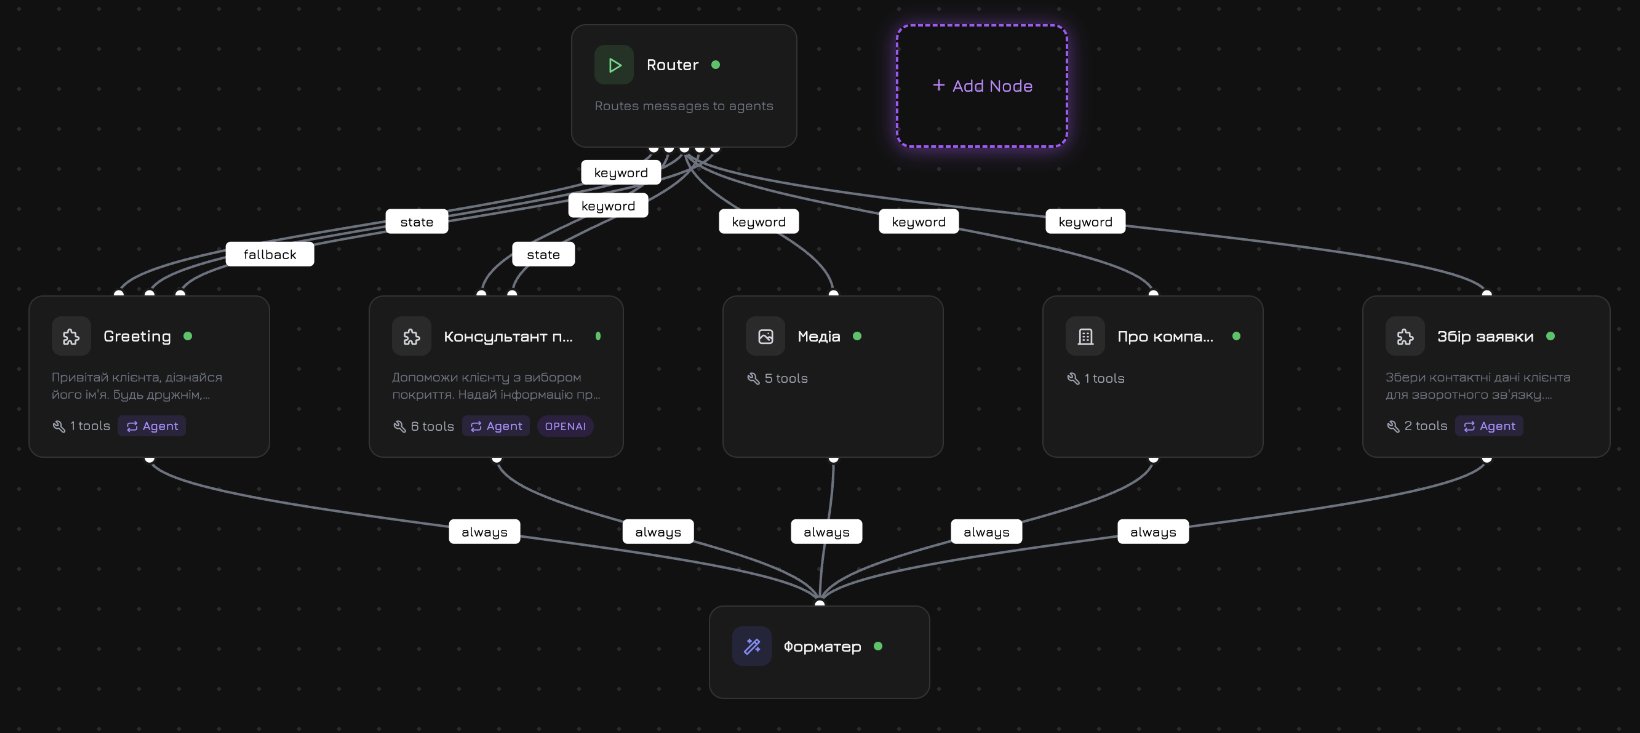
Tipos de nodos
| Nodo | Tipo | Descripción |
|---|---|---|
| Inicio | start | Punto de entrada. Siempre presente, no se puede eliminar. |
| Agente de productos | system_product | Busca productos, verifica disponibilidad, muestra detalles. Tiene acceso a herramientas de productos. |
| Agente de medios | system_media | Recupera fotos, videos y documentos. |
| Agente de empresa | system_company | Información de la empresa, preguntas de soporte. |
| Formateador de respuestas | system_formatter | Combina las salidas de nodos paralelos en una respuesta final coherente. |
| Entrada de voz (STT) | system_stt | Conversión de voz a texto. Inactivo por defecto. |
| Salida de voz (TTS) | system_tts | Síntesis de texto a voz. Inactivo por defecto. |
| Personalizado | custom | Su propio nodo con prompt personalizado, herramientas, base de conocimiento y configuración de LLM. |
Agregar nodos personalizados
Haga clic en + Agregar nodo en la barra de herramientas del lienzo → ingrese un nombre → un nuevo nodo Personalizado aparece en el lienzo. Puede agregar tantos nodos personalizados como necesite. Los nodos personalizados son la parte más poderosa del flujo de trabajo. Cada nodo personalizado es esencialmente su propio mini-agente con:- Objetivo de conversación — un prompt del sistema específico para este nodo (p. ej., “Ayudar a los usuarios a elegir el plan de suscripción correcto según el tamaño de su equipo y presupuesto”)
- Herramientas — seleccione qué herramientas puede llamar este nodo (independiente de las herramientas a nivel de agente)
- Base de conocimiento — seleccione fuentes de conocimiento específicas para el contexto RAG de este nodo
- Anulación de LLM — use un modelo diferente para este nodo
- Modo agente — habilite las llamadas de herramientas de múltiples turnos (ver más abajo)
Panel de configuración de nodos
Haga clic en cualquier nodo del lienzo para abrir su panel de configuración a la derecha. El panel tiene pestañas que varían según el tipo de nodo: Pestaña General (todos los nodos):| Configuración | Descripción |
|---|---|
| Nombre | Nombre para mostrar (deshabilitado para el nodo Inicio) |
| Activo | Alternar si este nodo participa en el flujo de trabajo |
| Objetivo de conversación | Prompt del sistema para este nodo. Disponible en todos los nodos excepto Inicio y Formateador. |
| Configuración | Rango | Predeterminado | Descripción |
|---|---|---|---|
| Rondas máximas | 2–10 | 5 | Cuántas rondas de llamadas a herramientas puede hacer el LLM antes de responder |
| Tiempo de espera | 10–60s | 30s | Tiempo máximo para toda la ejecución del modo agente |
Una nota en la parte inferior enlaza a la pestaña Base de conocimiento del agente: “Para que más datos estén disponibles para este nodo, agregue archivos a la Base de conocimiento del agente.”
Condiciones de aristas
Las aristas conectan nodos y controlan el enrutamiento de mensajes. Cada arista tiene un nodo destino, un tipo de condición y una prioridad. El flujo de trabajo evalúa las aristas en niveles de prioridad — el primer nivel que produce una coincidencia gana, los niveles inferiores no se evalúan. Haga clic en + Agregar arista en la pestaña Aristas de un nodo para crear una conexión.| Condición | Prioridad | Cuándo enruta |
|---|---|---|
| Palabra clave | 100 (más alta) | El mensaje contiene cualquiera de las palabras clave especificadas. Coincidencia insensible a mayúsculas, límites de palabra. |
| Condición de estado | 95 | Todas las condiciones de campos de memoria especificadas se cumplen (lógica AND). |
| Siempre | 90 | Siempre enruta — úselo para conexiones incondicionales. |
| Intención | 50 | Basado en la intención detectada del mensaje. |
| Respaldo | 10 (más baja) | Enruta solo si ninguna otra arista de este nodo coincidió. |
Condición de palabra clave
Ingrese palabras clave separadas por comas. El flujo de trabajo verifica si el mensaje del visitante contiene alguna de ellas utilizando coincidencia insensible a mayúsculas con límites de palabra. Múltiples aristas de palabras clave pueden coincidir con el mismo mensaje — todas las aristas coincidentes se activan en paralelo, enviando el mensaje a múltiples nodos simultáneamente. Ejemplo: Palabras claveprecio, costo, tarifas, cuánto cuesta — la arista se activa cuando el visitante pregunta “¿Cuánto cuesta?” o “¿Cuáles son las tarifas?”
Condición de estado
Verifica los valores de los campos de Memoria de conversación. Usted construye reglas con:| Operador | Significado | Ejemplo |
|---|---|---|
| está completado | El campo tiene algún valor | email está completado → enrutar al nodo “Enviar oferta” |
| está vacío | El campo no tiene valor | name está vacío → enrutar al nodo “Preguntar nombre” |
| es igual a | Coincidencia exacta | budget es igual a enterprise |
| no es igual a | No coincide | plan no es igual a free |
| contiene | Coincidencia de subcadena | interests contiene premium |
| mayor que | Comparación numérica | budget > 5000 |
| menor que | Comparación numérica | team_size < 10 |
Las condiciones de estado se omiten completamente si la memoria está vacía (aún no se han recopilado campos). Esto significa que las condiciones “está vacío” no se activarán hasta que el agente haya comenzado a recopilar al menos un campo de memoria.
Condición Siempre
La arista siempre se activa. Todas las aristas Siempre de un nodo se activan en paralelo — el mensaje se envía a todos los destinos simultáneamente. Así es como el flujo de trabajo predeterminado se ramifica desde Inicio hacia tres agentes del sistema a la vez.Condición de respaldo
Enruta solo cuando ninguna arista de mayor prioridad coincidió. A diferencia de Palabra clave y Siempre, solo una arista de respaldo se activa (la primera) — sin ejecución en paralelo.Estrategia de fusión
Cuando múltiples nodos producen resultados en paralelo (como los 3 agentes del sistema en el flujo de trabajo predeterminado), el Formateador los combina:| Estrategia | Costo | Cómo funciona |
|---|---|---|
| Concatenar | Gratis | Concatena todas las salidas de los nodos en contexto para el Formateador |
| LLM | Llamada adicional al LLM | Usa un LLM para sintetizar una sola respuesta coherente a partir de todas las salidas |
Controles del lienzo
| Control | Acción |
|---|---|
| Arrastrar área vacía | Desplazar el lienzo |
| Ctrl + Scroll o pellizcar | Zoom (0.3x–2.0x) |
| Scroll con dos dedos | Desplazar |
| + Agregar nodo | Crear un nuevo nodo personalizado |
| Plantilla | Aplicar una plantilla de flujo de trabajo preconstruida del marketplace |
| Restablecer | Reconstruir el flujo de trabajo predeterminado (diálogo de confirmación) |
| Probar | Abrir el panel de chat de prueba en la parte inferior del lienzo |
Herramientas
Las herramientas son funciones que el agente puede llamar durante las conversaciones. Extienden al agente más allá de la generación de texto: buscar productos, consultar bases de datos, enviar correos electrónicos, realizar llamadas.Cómo funcionan las herramientas
El LLM decide usar una herramienta
Basándose en el mensaje del visitante y las descripciones de herramientas en su prompt, el LLM genera una llamada a herramienta con parámetros (p. ej.,
get_products({ query: "zapatillas deportivas", available_only: true })).La herramienta se ejecuta
El sistema ejecuta la función de la herramienta con los parámetros proporcionados y obtiene un resultado.
El resultado vuelve al LLM
El resultado de la herramienta se inyecta de vuelta en la conversación. El LLM lo usa para formular una respuesta natural.
Herramientas integradas (9)
Siempre disponibles, no requieren integración:| Herramienta | Categoría | Qué hace |
|---|---|---|
| get_products | Productos | Busca productos por nombre/descripción. Devuelve lista con precios y disponibilidad. |
| get_product_details | Productos | Detalles completos de un producto — todos los parámetros, precios, descripción. |
| check_availability | Productos | Verifica si un producto específico está en stock. |
| search_by_parameters | Productos | Filtra productos por valores de atributos con operadores: =, <=, >=, <, >, like. |
| get_company_info | Soporte | Nombre de la empresa, descripción, teléfono, contactos. |
| search_documents | Documentos | Búsqueda semántica RAG — encuentra pasajes relevantes en la base de conocimiento. |
| get_photos | Documentos | Recupera fotos por consulta o ID de producto. |
| get_videos | Documentos | Recupera videos por consulta o ID de producto. |
| get_documents | Documentos | Recupera archivos PDF/Word/Excel, filtrables por formato. |
Herramientas de integración (más de 60)
Conecte servicios externos en Integraciones para desbloquear herramientas:VoIP — Twilio, Binotel, Ringostat
VoIP — Twilio, Binotel, Ringostat
Realice llamadas salientes, envíe SMS, recupere el historial de llamadas.
Telegram
Telegram
Envíe mensajes, envíe archivos, edite/elimine mensajes, obtenga historial de chat e información.
WhatsApp
Envíe mensajes, envíe medios, envíe mensajes de plantilla, obtenga perfil, marque como leído.
Facebook e Instagram
Facebook e Instagram
Envíe mensajes, envíe medios, envíe botones (Facebook), obtenga perfil. Facebook Ads: obtenga campañas, conjuntos de anuncios, estadísticas, pause campañas.
Gmail
Gmail
Lea la bandeja de entrada, envíe correos electrónicos, responda, cree borradores, busque, obtenga archivos adjuntos.
Google Calendar
Google Calendar
Liste/cree/actualice/elimine eventos, verifique disponibilidad, encuentre franjas horarias libres.
Google Docs
Google Docs
Lea/cree/añada/exporte/busque documentos.
Google Sheets
Google Sheets
Lea/escriba rangos, añada filas, actualice celdas, busque filas, cree hojas de cálculo.
Google Drive
Google Drive
Liste/lea/cree/actualice/elimine archivos, cree carpetas, comparta archivos, busque.
Google Meet
Google Meet
Cree enlaces de reunión.
Google Ads
Google Ads
Obtenga campañas, obtenga palabras clave, pause campañas.
Webhooks
Webhooks
Envíe cargas JSON personalizadas a cualquier URL, pruebe conexiones de webhook.
Pestaña Herramientas vs Herramientas a nivel de nodo
Hay dos lugares para gestionar herramientas:- Agente → pestaña Herramientas — muestra todas las herramientas de integración agrupadas por proveedor. Active/desactive herramientas a nivel de agente. Las herramientas aquí quedan disponibles para todos los nodos del flujo de trabajo.
- Flujo de trabajo → Configuración de nodo → pestaña Herramientas — active/desactive herramientas por nodo. Un nodo solo puede usar herramientas que estén habilitadas a nivel de agente. Esto le permite restringir qué nodos tienen acceso a qué herramientas.
send_email — los demás nodos no activarán correos electrónicos.
Base de conocimiento (RAG)
La pestaña Base de conocimiento conecta fuentes de datos que el agente utiliza para responder preguntas. Cuando un visitante pregunta algo, el agente busca en su base de conocimiento utilizando similitud vectorial (RAG — Generación Aumentada por Recuperación) e incluye el contexto relevante en su respuesta.Tipos de fuentes
| Fuente | Qué se indexa |
|---|---|
| Productos | Nombre, descripción, prompt adicional, precio |
| Documentos | Nombre del archivo + contenido de texto extraído (PDF, Word, Excel, TXT) |
| Fotos | Nombre de la foto + descripción |
| Videos | Nombre del video + descripción/contenido |
| Texto | Nombre + contenido de texto libre |
| Enlaces | Nombre de la URL + contenido de la página obtenido |
| Empresa | Nombre de la empresa, texto promocional, descripción, teléfono |
Cómo funciona RAG
Agregar fuentes
En la pestaña Base de conocimiento, haga clic en “Agregar documento” y seleccione fuentes de los datos de su empresa — productos, archivos, fragmentos de texto, enlaces.
Entrenamiento
El sistema divide cada fuente en segmentos (máximo predeterminado de 2000 caracteres por segmento, 20% de superposición en los límites de oración), genera embeddings vectoriales utilizando OpenAI
text-embedding-ada-002 (1536 dimensiones) y los almacena en PostgreSQL con pgvector.El visitante envía un mensaje
El mensaje del visitante se convierte en embedding en el mismo espacio vectorial. El sistema encuentra los segmentos más similares utilizando similitud del coseno.
Inyección de contexto
Los segmentos más coincidentes (predeterminado: hasta 5, similitud mínima 0.6) se inyectan en el prompt del agente como contexto de la base de conocimiento.
Conocimiento a nivel de agente vs a nivel de nodo
- Base de conocimiento a nivel de agente (pestaña Base de conocimiento) — fuentes disponibles para todos los nodos del flujo de trabajo
- Base de conocimiento a nivel de nodo (Flujo de trabajo → Nodo → pestaña Base de conocimiento) — restrinja RAG a fuentes específicas solo para este nodo
Voz
La configuración de voz se establece en la sub-pestaña Voz de la pestaña Widget o directamente en los nodos STT/TTS del flujo de trabajo.Voz a texto (STT)
| Configuración | Opciones |
|---|---|
| Proveedor | OpenAI Whisper, Google Speech (próximamente) |
| Idioma | Ucraniano, Inglés |
| Saludo | Texto + audio pre-sintetizado que se reproduce cuando comienza la voz |
| Despedida | Texto + audio pre-sintetizado que se reproduce cuando termina la voz |
Texto a voz (TTS)
| Configuración | Opciones |
|---|---|
| Proveedor | OpenAI TTS (ElevenLabs y Google Cloud próximamente) |
| Voz | Alloy (neutral), Echo (cálida), Fable (expresiva), Onyx (profunda), Nova (amigable, predeterminada), Shimmer (suave) |
| Modelo | tts-1 (estándar), tts-1-hd (calidad HD) |
| Velocidad | 0.5x – 2.0x |
Pipeline de voz
Audio recibido
El audio del visitante se envía al servidor (máximo 10MB, formatos: webm, ogg, wav, mp3).
Transcripción STT
El audio se transcribe a texto. La transcripción se transmite en tiempo real vía SSE.
Procesamiento del flujo de trabajo
La transcripción se procesa a través del mismo flujo de trabajo que el texto — RAG, herramientas, enrutamiento de nodos.
Síntesis TTS
La respuesta se divide en oraciones, cada una se sintetiza a audio. Los fragmentos se transmiten a medida que se generan.
La voz requiere un plan con capacidades de voz. En los planes sin voz, los controles de voz muestran un aviso de actualización y el Modo solo chat se activa obligatoriamente.
Canales
La pestaña Canales controla dónde recibe mensajes su agente.| Canal | Requiere | Descripción |
|---|---|---|
| Widget | Nada (integrado) | Widget de chat en su sitio web mediante el script de seguimiento |
| Teléfono | Integración VoIP | Llamadas entrantes/salientes vía Twilio, Binotel o Ringostat |
| Telegram | Integración de Telegram | Conversaciones con bot de Telegram |
| Integración de WhatsApp | API de WhatsApp Business | |
| Integración de Instagram | Mensajes directos de Instagram |
Conexión de un canal
Widget — haga clic en Habilitar. El widget responde en su sitio web inmediatamente. Otros canales:- Conecte la integración en Integraciones
- En la pestaña Canales, seleccione un recurso del menú desplegable (p. ej., un número de teléfono, un bot, una página)
- Haga clic en Habilitar — se genera una URL de webhook única
Personalización del widget
La pestaña Widget tiene una vista previa en vivo a la izquierda (selector de escritorio/tablet/móvil) y un panel de configuración a la derecha con 3 sub-pestañas.Apariencia
| Configuración | Descripción |
|---|---|
| Colores | 6 selectores de color: Primario, Botón de chat, Fondo de mensaje, Animación, Estrellas de calificación, Texto de estado |
| Etiquetas | Título principal, Texto del botón de llamada, Texto del botón de chat, Marcador de posición del campo de entrada |
| Posición | Inferior derecha, Inferior centro, Inferior izquierda, Superior derecha, Superior centro, Superior izquierda |
| Tema | Claro u Oscuro |
| Tamaño | Pequeño, Mediano, Grande |
| Radio de borde | Redondez de esquinas de 0–50px |
| Opacidad | Opacidad del fondo de 0–100% |
| Avatar | URL de avatar personalizado |
Comportamiento
| Configuración | Descripción |
|---|---|
| Idioma | Inglés, Ucraniano, Polaco, Alemán, Español |
| Recopilación de comentarios | Mostrar calificación por estrellas después de la conversación |
| Texto durante la llamada | Permitir escribir mientras la llamada de voz está activa |
| Modo solo chat | Deshabilitar voz (solo texto). Se activa obligatoriamente en los planes sin voz. |
| Términos y condiciones | Requerir aceptación antes del chat. Texto y URL personalizados. |
| Efectos de sonido | Sonidos de notificación activados/desactivados |
| Apertura automática | Abrir el widget automáticamente después de un retraso (0–60 segundos) |
| Saludo automático | Enviar el primer mensaje automáticamente |
| Mostrar en móvil | Mostrar en dispositivos móviles |
| Mostrar en escritorio | Mostrar en dispositivos de escritorio |
| Powered By | Mostrar/ocultar el branding “Powered by Revol” |
| Mensaje de bienvenida | Texto mostrado en el encabezado del widget |
Voz
Configuraciones de STT y TTS — las mismas descritas en la sección Voz. Se configuran aquí o en los nodos STT/TTS del flujo de trabajo (se sincronizan).Análisis
Diseño de dos columnas: lista de conversaciones (izquierda) + detalle de conversación (derecha).Filtros
| Filtro | Descripción |
|---|---|
| Búsqueda | Búsqueda de texto en las conversaciones |
| Canal | Todos / Web / Telefonía / Mensajería / Widget / etc. |
| Estado | Todos / Activo / Cerrado / Archivado |
| Rango de fechas | Selectores de fecha Desde/Hasta |
Detalle de conversación (4 sub-pestañas)
| Pestaña | Contenido |
|---|---|
| Transcripción | Hilo completo de mensajes — burbujas de usuario y asistente con marcas de tiempo |
| Calificación | Calificación por estrellas del visitante (1–5) y comentario opcional |
| Tokens | Desglose del uso de tokens por mensaje |
| Información | Canal, estado, ID de sesión, campos de memoria recopilados, fecha de creación |
Arquitectura del prompt del sistema
Comprender cómo se ensambla el prompt final le ayuda a escribir mejores instrucciones.Su prompt del sistema
El texto de la pestaña Agente (o el Objetivo de conversación del nodo para nodos personalizados). Si está vacío, se genera un prompt predeterminado con el nombre de su empresa y reglas básicas.
Bloque de seguridad
Se añade automáticamente. 4 reglas anti-inyección — el agente no revelará su prompt, cambiará su rol ni seguirá intentos de anulación.
Instrucciones de estilo
Generadas a partir de los controles deslizantes de personalidad — mapea la longitud de respuesta, humor, formalidad, claridad y emojis a instrucciones de texto.
Descripciones de herramientas
Esquemas de funciones para todas las herramientas habilitadas, para que el LLM sepa qué puede llamar.
Contexto RAG
Segmentos relevantes de la base de conocimiento, inyectados como bloque “Contexto de la base de conocimiento”.
Contexto de campaña
Si el visitante llegó a través de una campaña con Comportamiento del agente de IA configurado, ese prompt se inyecta.
Estado de la memoria
Valores actuales de los campos de memoria recopilados (p. ej.,
name: Juan, email: juan@ejemplo.com), para que el agente sepa lo que ya ha recopilado.Código de inserción
Haga clic en Insertar en el encabezado del agente para obtener el fragmento HTML:Límites del plan
| Recurso | Qué controla |
|---|---|
| Máximo de agentes | Total de agentes que puede crear |
| Máximo de conversaciones | Conversaciones por período de facturación |
| Cuota de tokens estándar | Tokens para modelos estándar (GPT-4o Mini, Haiku, Flash, Llama 8B) |
| Cuota de tokens premium | Tokens para modelos premium (GPT-4o, Sonnet, Gemini Pro, Llama 70B) |
| Límite diario de tokens | Tope diario para todos los modelos |
| Minutos de STT | Tiempo de transcripción de voz a texto |
| Caracteres de TTS | Caracteres de síntesis de texto a voz |
| Tokens de embedding | Tokens para el entrenamiento de la base de conocimiento |
| Almacenamiento | Almacenamiento de archivos para documentos, fotos, videos |
| Voz | Indicador de función — habilita/deshabilita el pipeline de voz |
| Acceso a modelos | standard o premium — controla el acceso a modelos premium |