Overview
Revol uses a token-based billing model powered by Stripe. Every AI interaction consumes tokens — the more your agents work, the more tokens are used. Choose a plan that fits your volume, and purchase add-on packs when you need more resources without upgrading.
Pricing Page
Navigate to Billing → Pricing Plan to compare plans and subscribe.
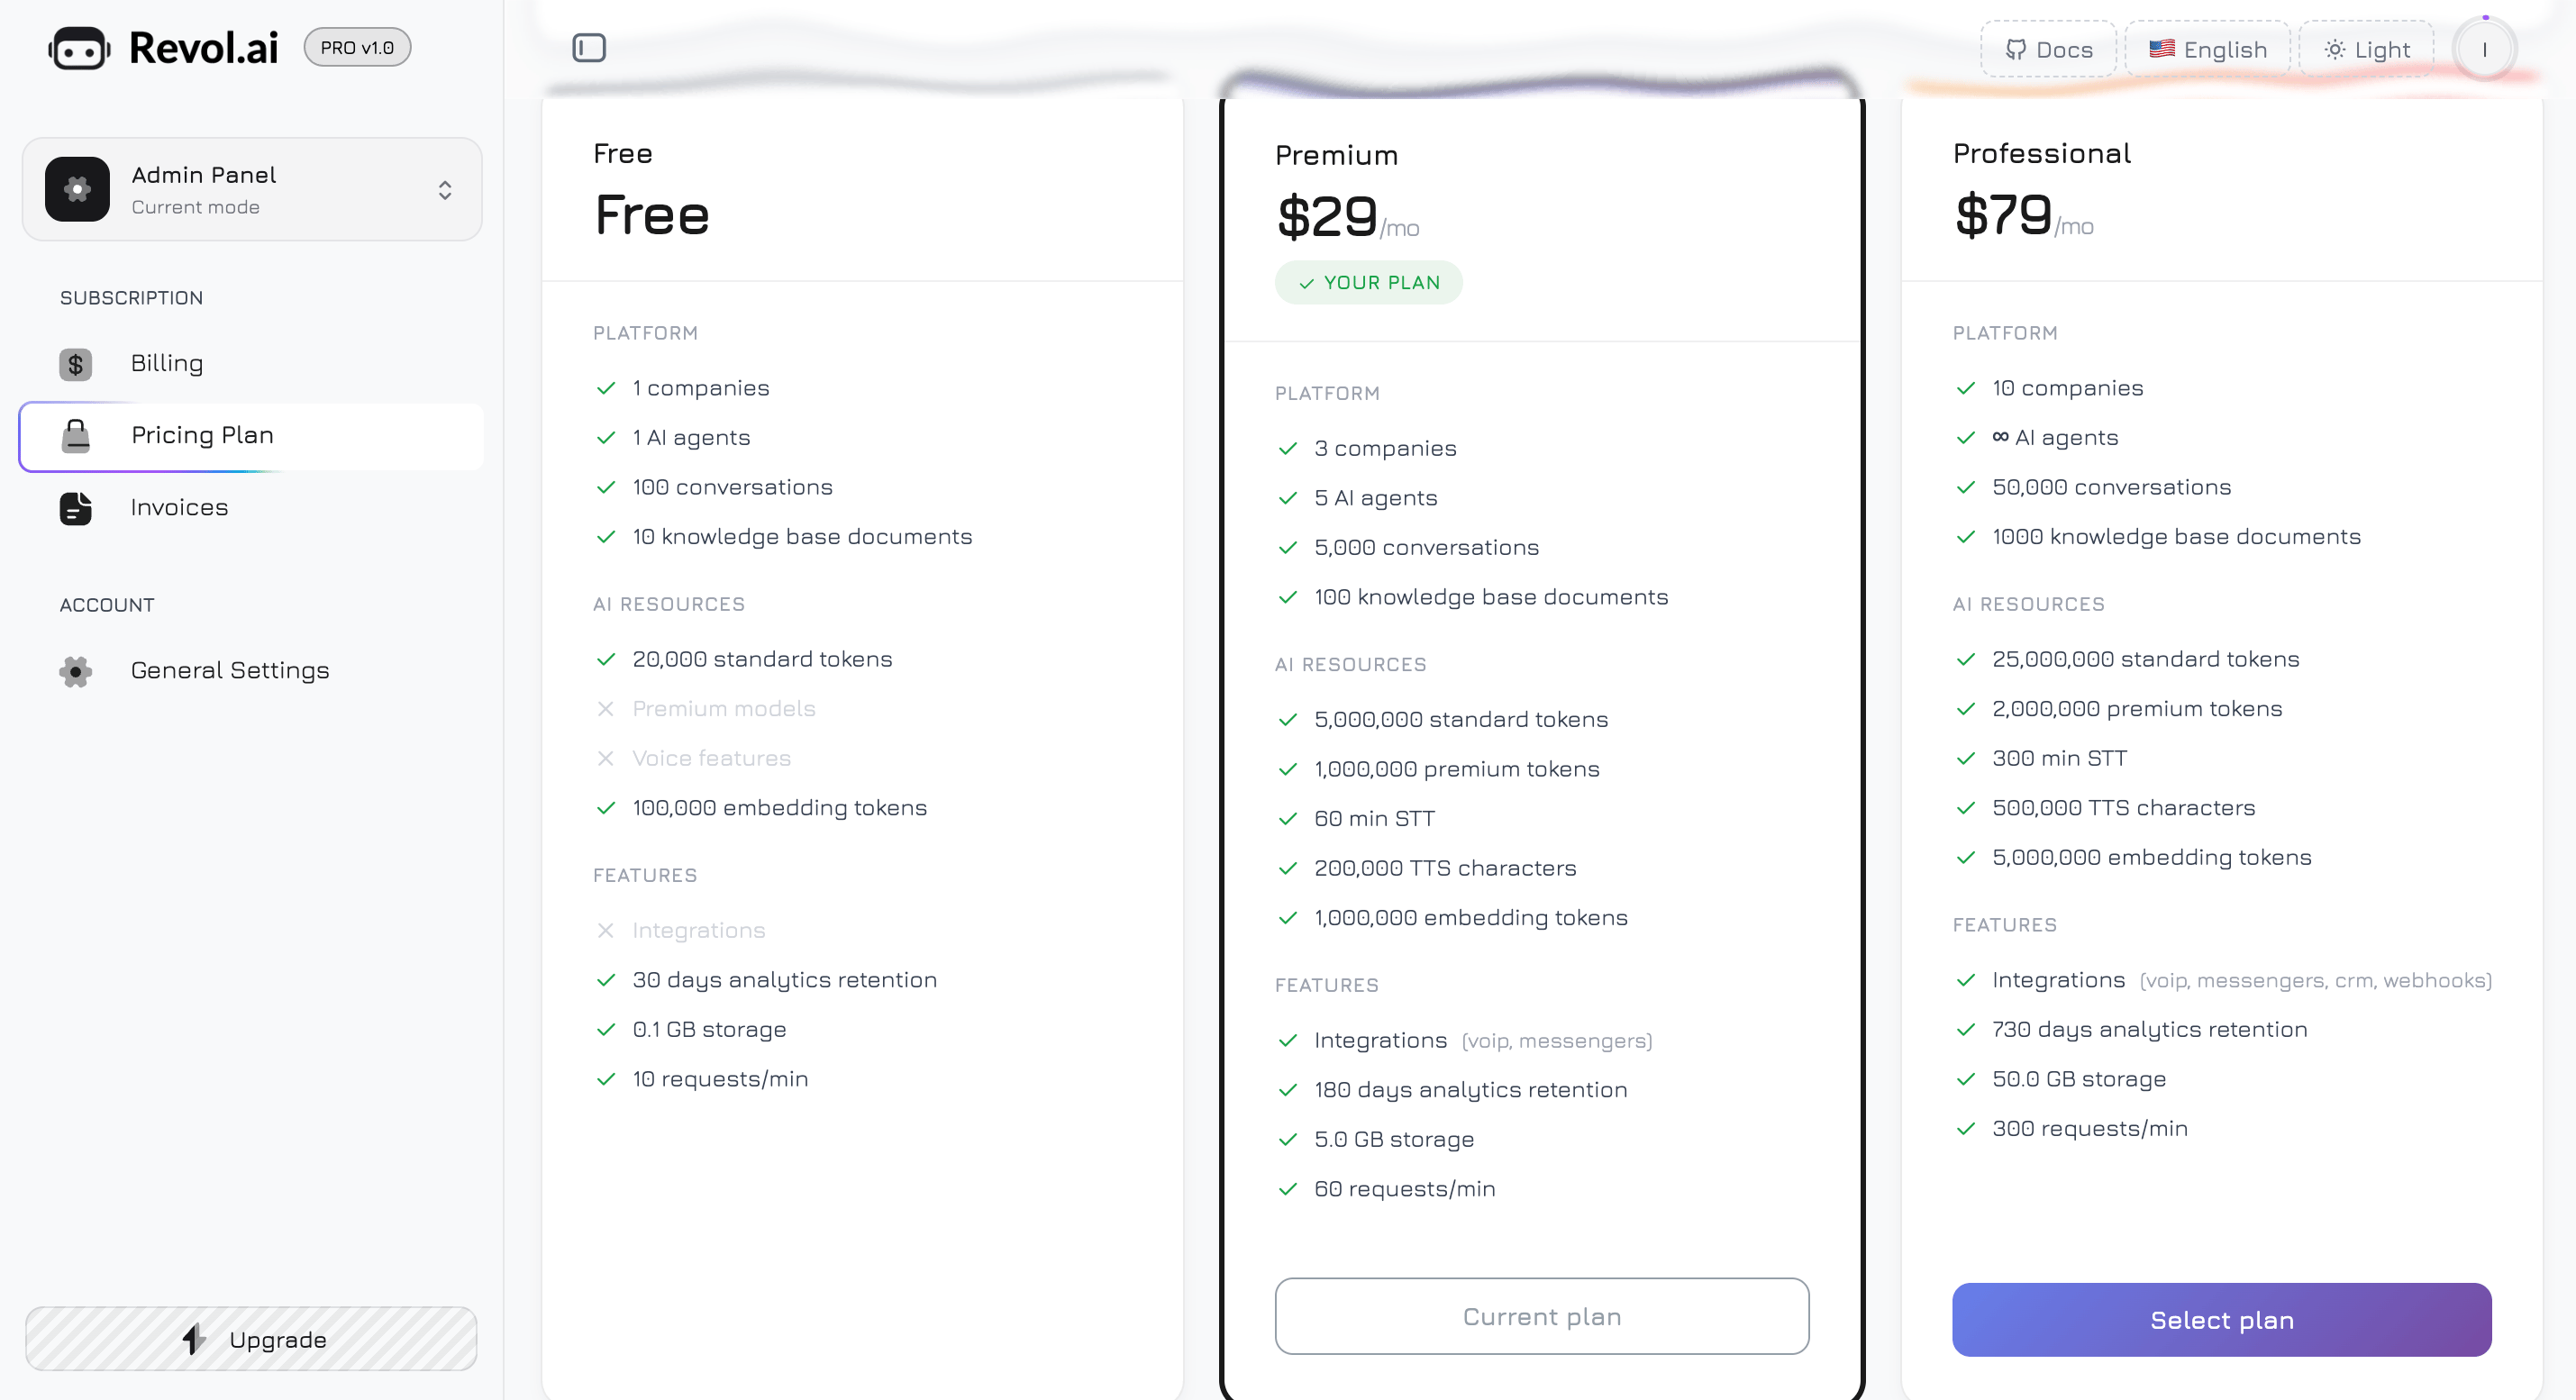
The page displays a hero card at the top with your current plan badge and a Manage Subscription button (paid plans only), followed by three plan cards arranged side by side.
Your current plan card is highlighted with a dark border and a green “Your Plan” badge. Each card is divided into three feature groups: Platform, AI Resources, and Features. Included capabilities show a green checkmark, while unavailable features show a grey X.
Plans
Free
Premium
Professional
$0/month — get started and explore the platform| Resource | Limit |
|---|
| Companies | 1 |
| AI Agents | 1 |
| Standard Tokens | 20,000 / day |
| Premium Tokens | — |
| Voice (STT) | — |
| Voice (TTS) | — |
| Embedding Tokens | 100,000 / month |
| Storage | 100 MB |
| Knowledge Docs | 10 |
| Conversations | 100 |
| Tracking Retention | 30 days |
| Integrations | — |
| Widget Branding | Revol branding |
| Marketplace | Browse only |
| Rate Limit | 10 req/min |
$29/month — for growing businesses| Resource | Limit |
|---|
| Companies | 3 |
| AI Agents | 5 |
| Standard Tokens | 5,000,000 / billing cycle |
| Premium Tokens | 1,000,000 / billing cycle |
| Voice (STT) | 60 min |
| Voice (TTS) | 200,000 chars |
| Embedding Tokens | 1,000,000 / billing cycle |
| Storage | 5 GB |
| Knowledge Docs | 100 |
| Conversations | 5,000 |
| Tracking Retention | 180 days |
| Integrations | VoIP + Messengers |
| Widget Branding | Custom |
| Marketplace | Install + Publish |
| Rate Limit | 60 req/min |
$79/month — for agencies and enterprises| Resource | Limit |
|---|
| Companies | 10 |
| AI Agents | Unlimited |
| Standard Tokens | 25,000,000 / billing cycle |
| Premium Tokens | 2,000,000 / billing cycle |
| Voice (STT) | 300 min |
| Voice (TTS) | 500,000 chars |
| Embedding Tokens | 5,000,000 / billing cycle |
| Storage | 50 GB |
| Knowledge Docs | 1,000 |
| Conversations | 50,000 |
| Tracking Retention | 730 days (2 years) |
| Integrations | All (VoIP, Messengers, Google Workspace, Ads, Webhooks) |
| Widget Branding | White Label |
| Marketplace | Install + Publish + Priority |
| Rate Limit | 300 req/min |
The Free plan resets token usage daily (UTC midnight). Paid plans reset at the start of each billing cycle (the date you subscribed).
Model Access
Each plan determines which AI models are available:
| Tier | Models | Plans |
|---|
| Standard | GPT-4o Mini, Claude 3.5 Haiku, Gemini 2.0 Flash, Llama 3.1 8B | All plans |
| Premium | GPT-4o, Claude 3.5 Sonnet, Gemini 2.5 Pro, Llama 3.3 70B | Premium and Professional |
Payment via Stripe
All payments are processed securely through Stripe. Revol does not store your card details — everything is handled by Stripe’s PCI-compliant infrastructure.
Subscribing to a Plan
- Go to Billing → Pricing Plan and click Select Plan on the desired plan card
- You are redirected to a Stripe Checkout page — enter your card details and confirm
- After successful payment, your plan activates immediately and all new limits take effect
- A subscription is created with automatic monthly renewal
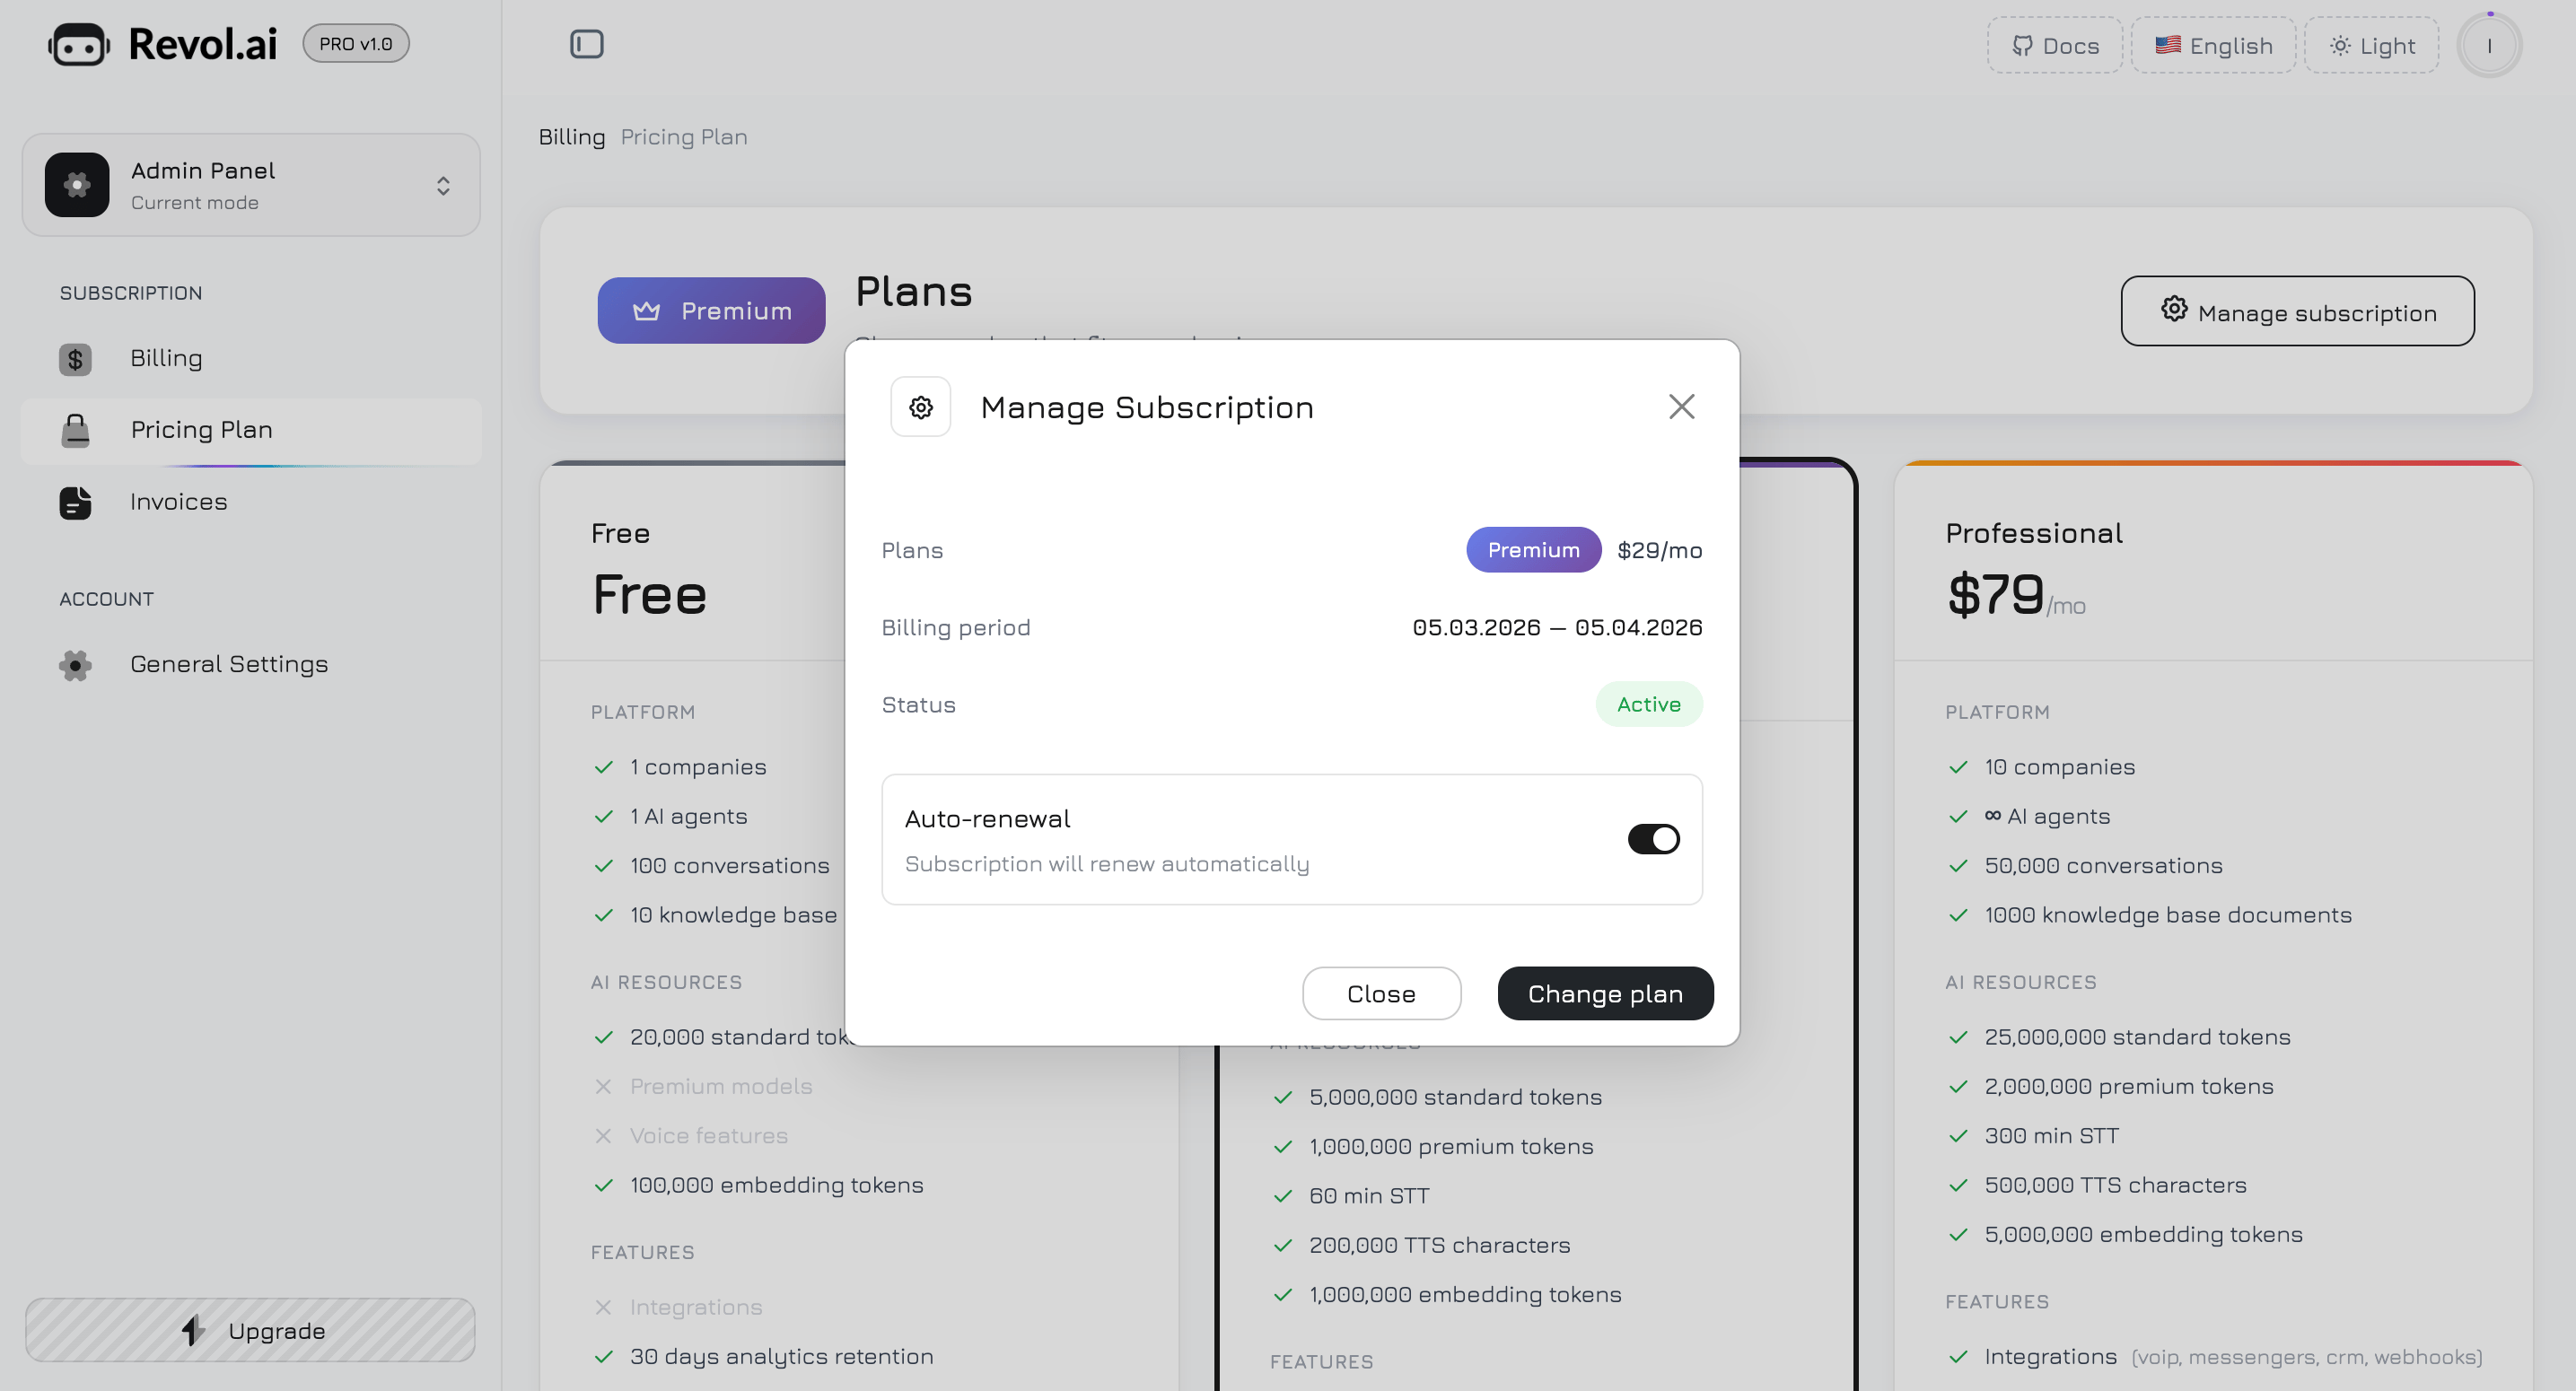
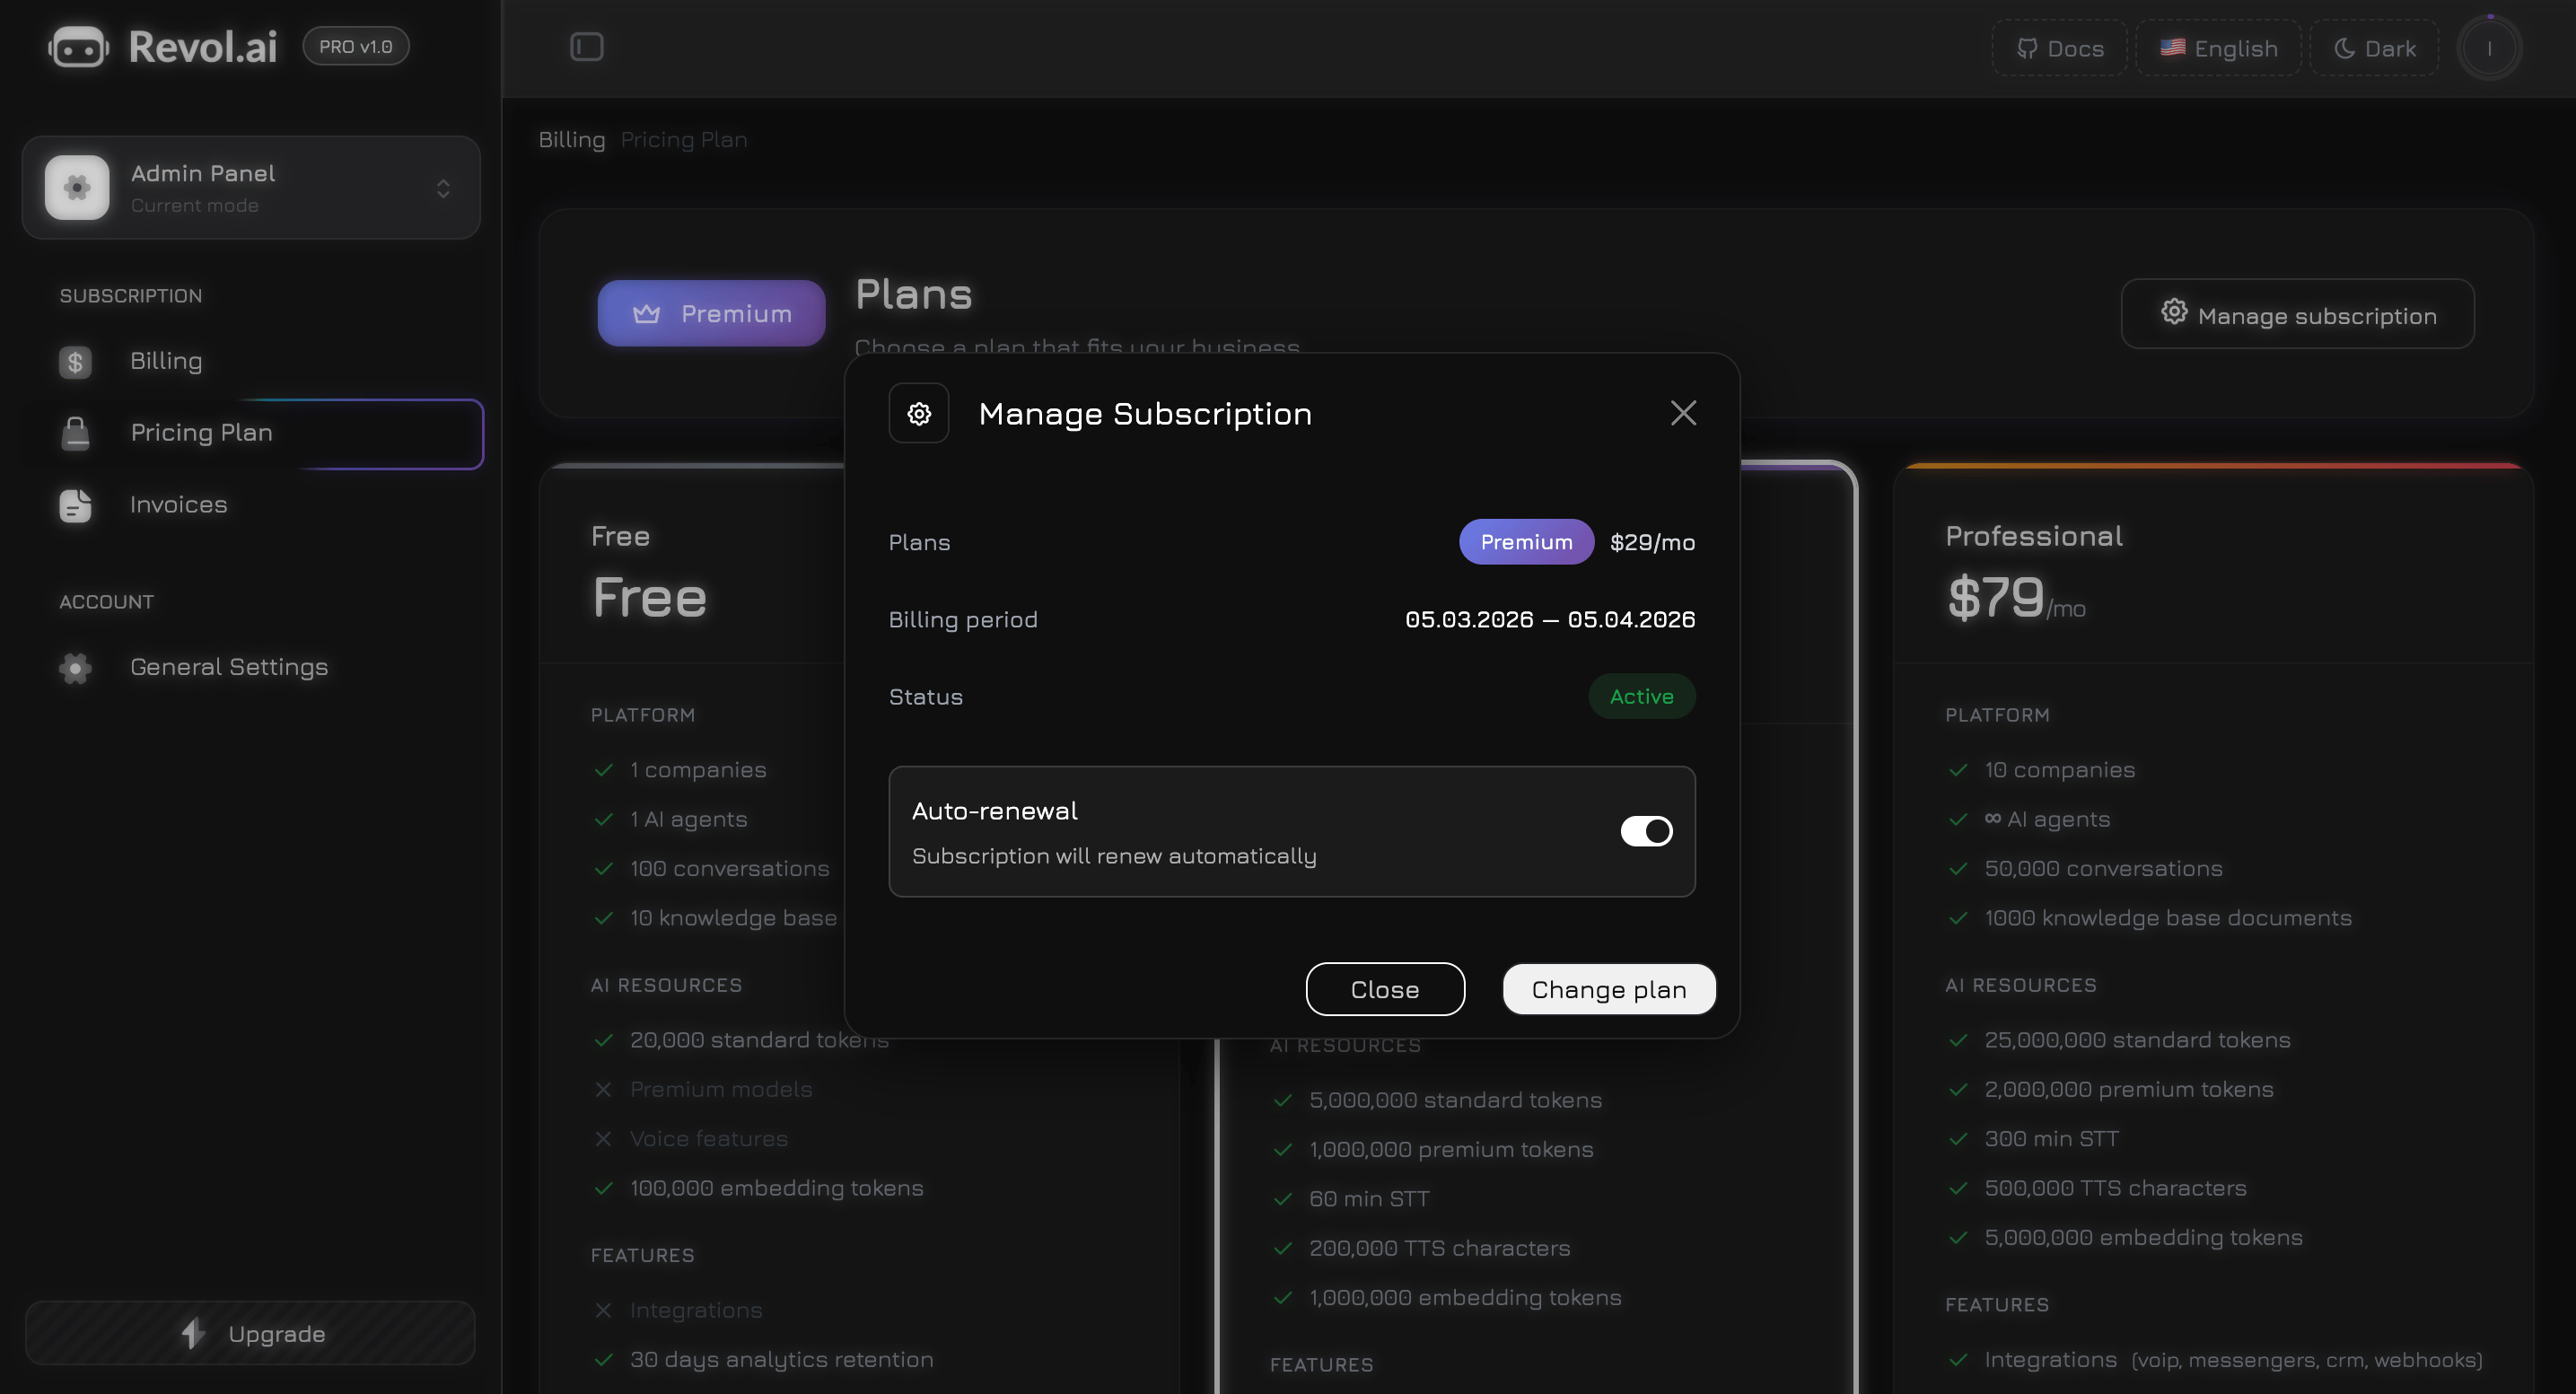
Managing Your Subscription
Click the Manage button on the Overview or Pricing page to open the Manage Subscription modal.
The modal displays three information rows:
| Row | Description |
|---|
| Plan | Your current plan name with a gradient badge, plus the monthly price |
| Billing Period | Start and end dates of the current billing cycle (e.g., 15.03.2026 — 15.04.2026) |
| Status | A colored badge — Active (green), Canceling (amber), or Canceled (red) |
- Turning off cancels the subscription at the end of the current billing period. A confirmation dialog appears before proceeding. You keep full access until the period ends (grace period).
- Turning on resumes a previously canceled subscription if the grace period hasn’t expired yet.
During the grace period, a yellow warning appears: “Your subscription will end on DD.MM.YYYY. Auto-renewal is disabled.”
Footer buttons:
- Close — dismiss the modal
- Change Plan — navigate to the Pricing page to upgrade or downgrade
Payment Methods — click Manage Payment Methods on the Overview page to open the Stripe Customer Portal, where you can update cards, view receipts, and manage billing details.
When you cancel a subscription, it remains active until the end of the current billing period (grace period). After that, you are automatically downgraded to the Free plan. All your data is preserved, but limits are reduced.
Upgrading and Downgrading
- Upgrade — takes effect immediately. You are charged the new plan price, prorated for the remaining days in the current period.
- Downgrade — takes effect at the end of the current billing period. You keep full access to the higher plan until the period ends.
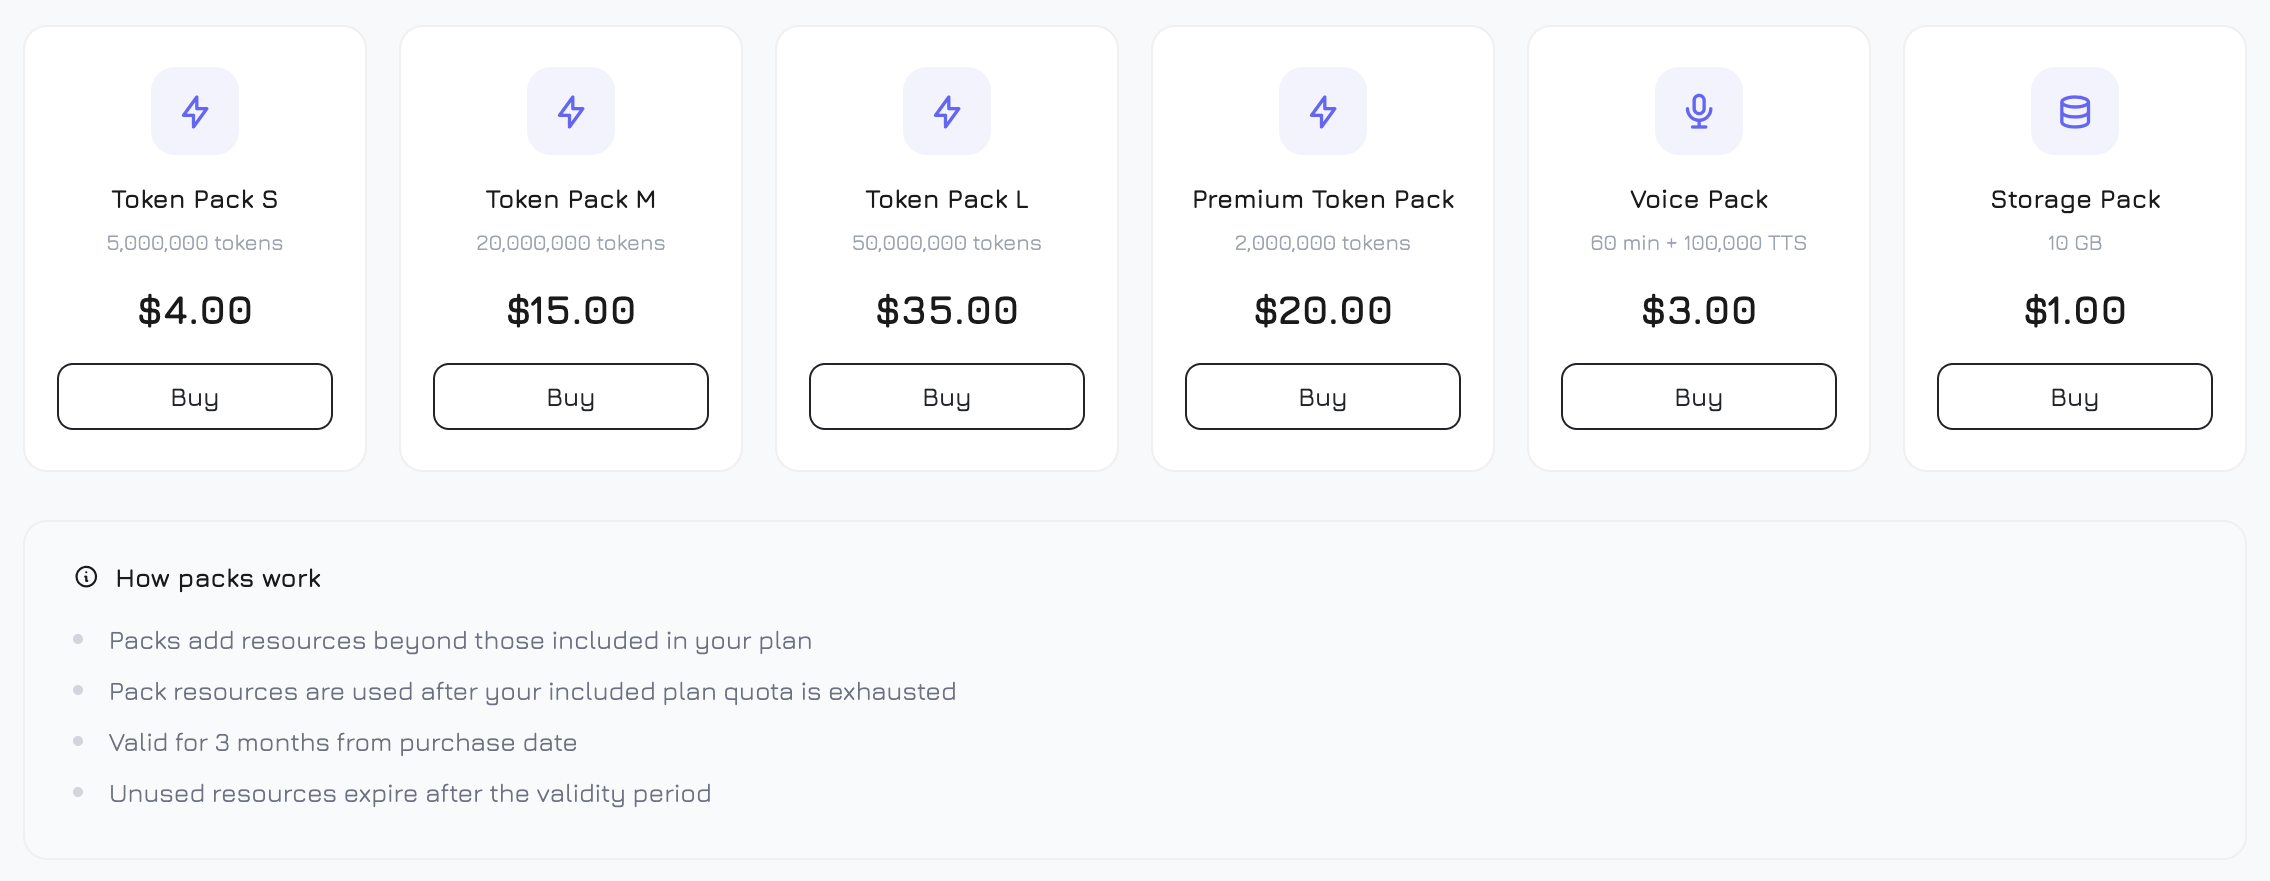
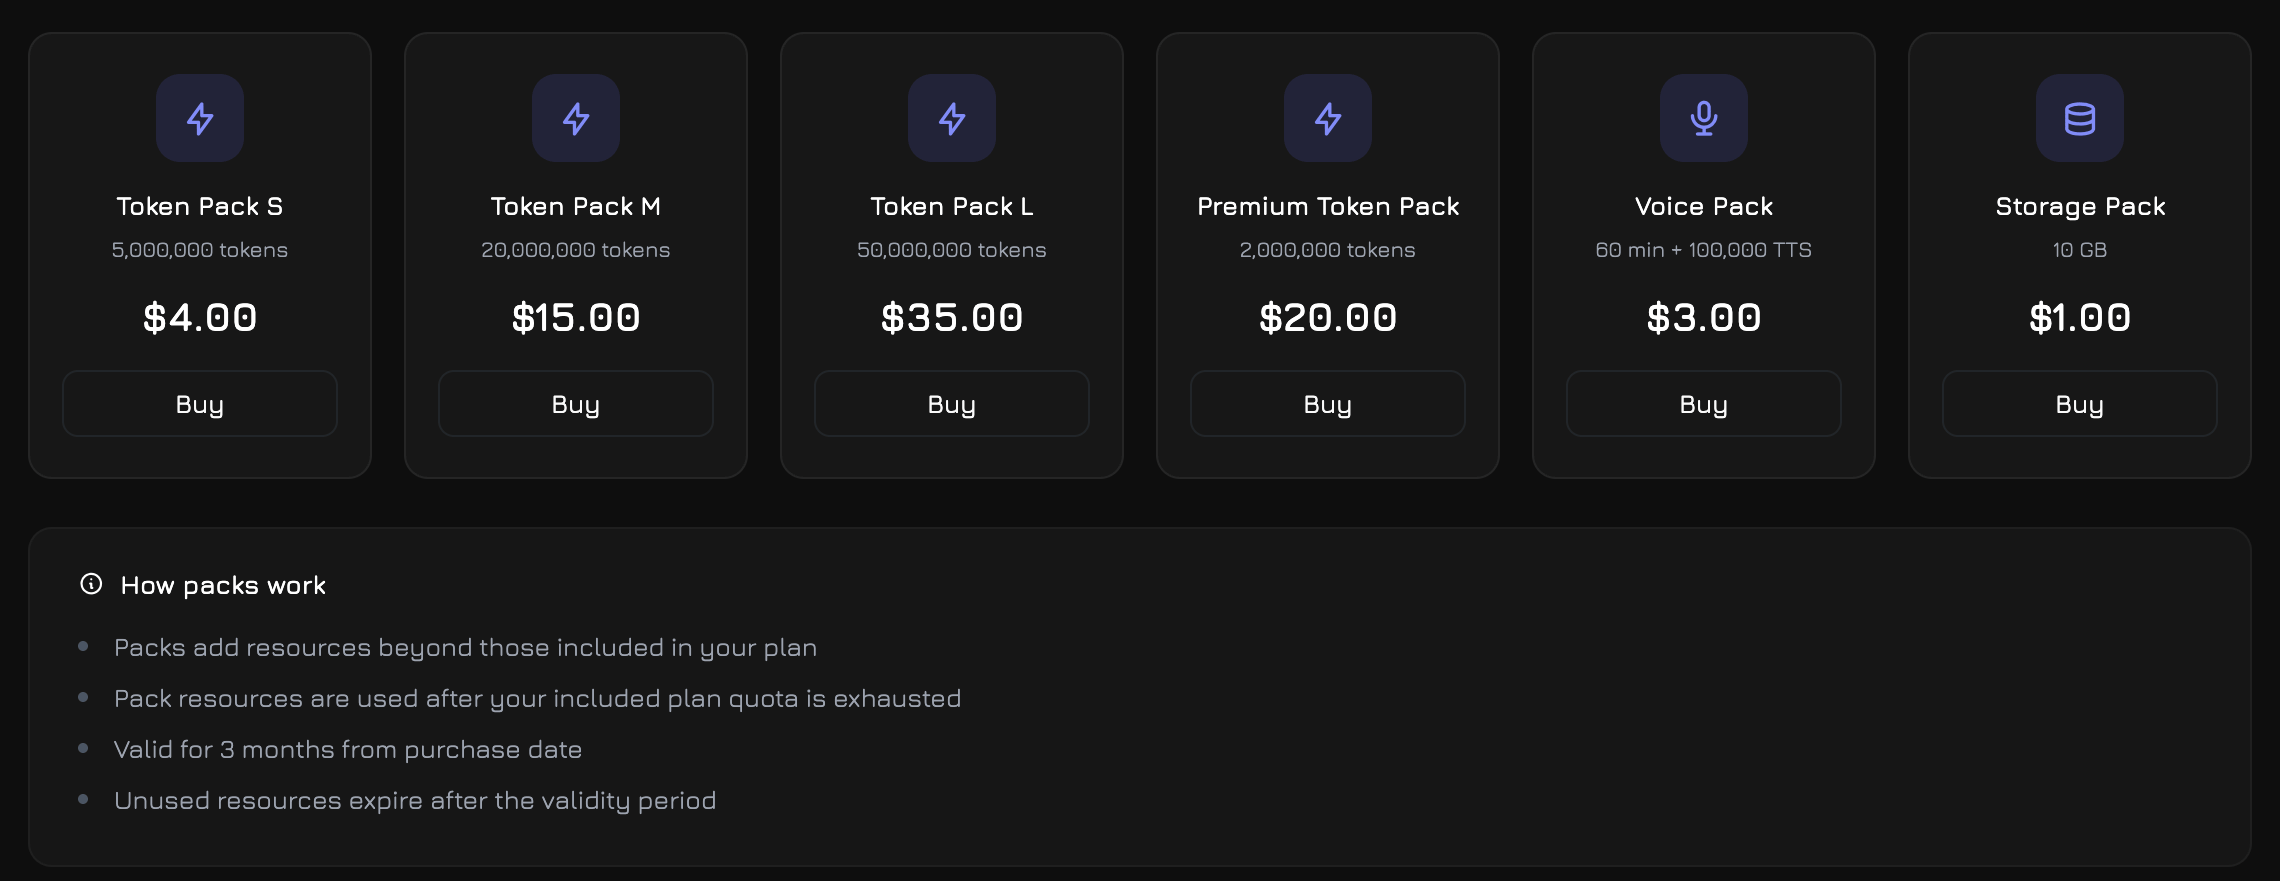
Add-on Packs
Need more resources without upgrading your plan? Purchase one-time add-on packs from Billing → Pricing Plan (packs section at the bottom) or the dedicated Add-on Packs page.
The packs page displays a 6-column grid (3 on tablet, 2 on mobile) of available packs:
| Pack | What You Get | Price |
|---|
| Token Pack S | 5,000,000 standard tokens | $4 |
| Token Pack M | 20,000,000 standard tokens | $15 |
| Token Pack L | 50,000,000 standard tokens | $35 |
| Premium Token Pack | 2,000,000 premium tokens | $20 |
| Voice Pack | 60 STT minutes + 100,000 TTS characters | $3 |
| Storage Pack | 10 GB additional storage | $1 |
Add-on packs expire 3 months after purchase. Unused resources do not roll over. When you have multiple active packs, the oldest-expiring pack is consumed first.
Packs supplement your plan limits — they are used only after your included plan quota is exhausted. For example, if your Premium plan includes 5M standard tokens and you purchased a Token Pack S (5M), you effectively have 10M tokens for that period.
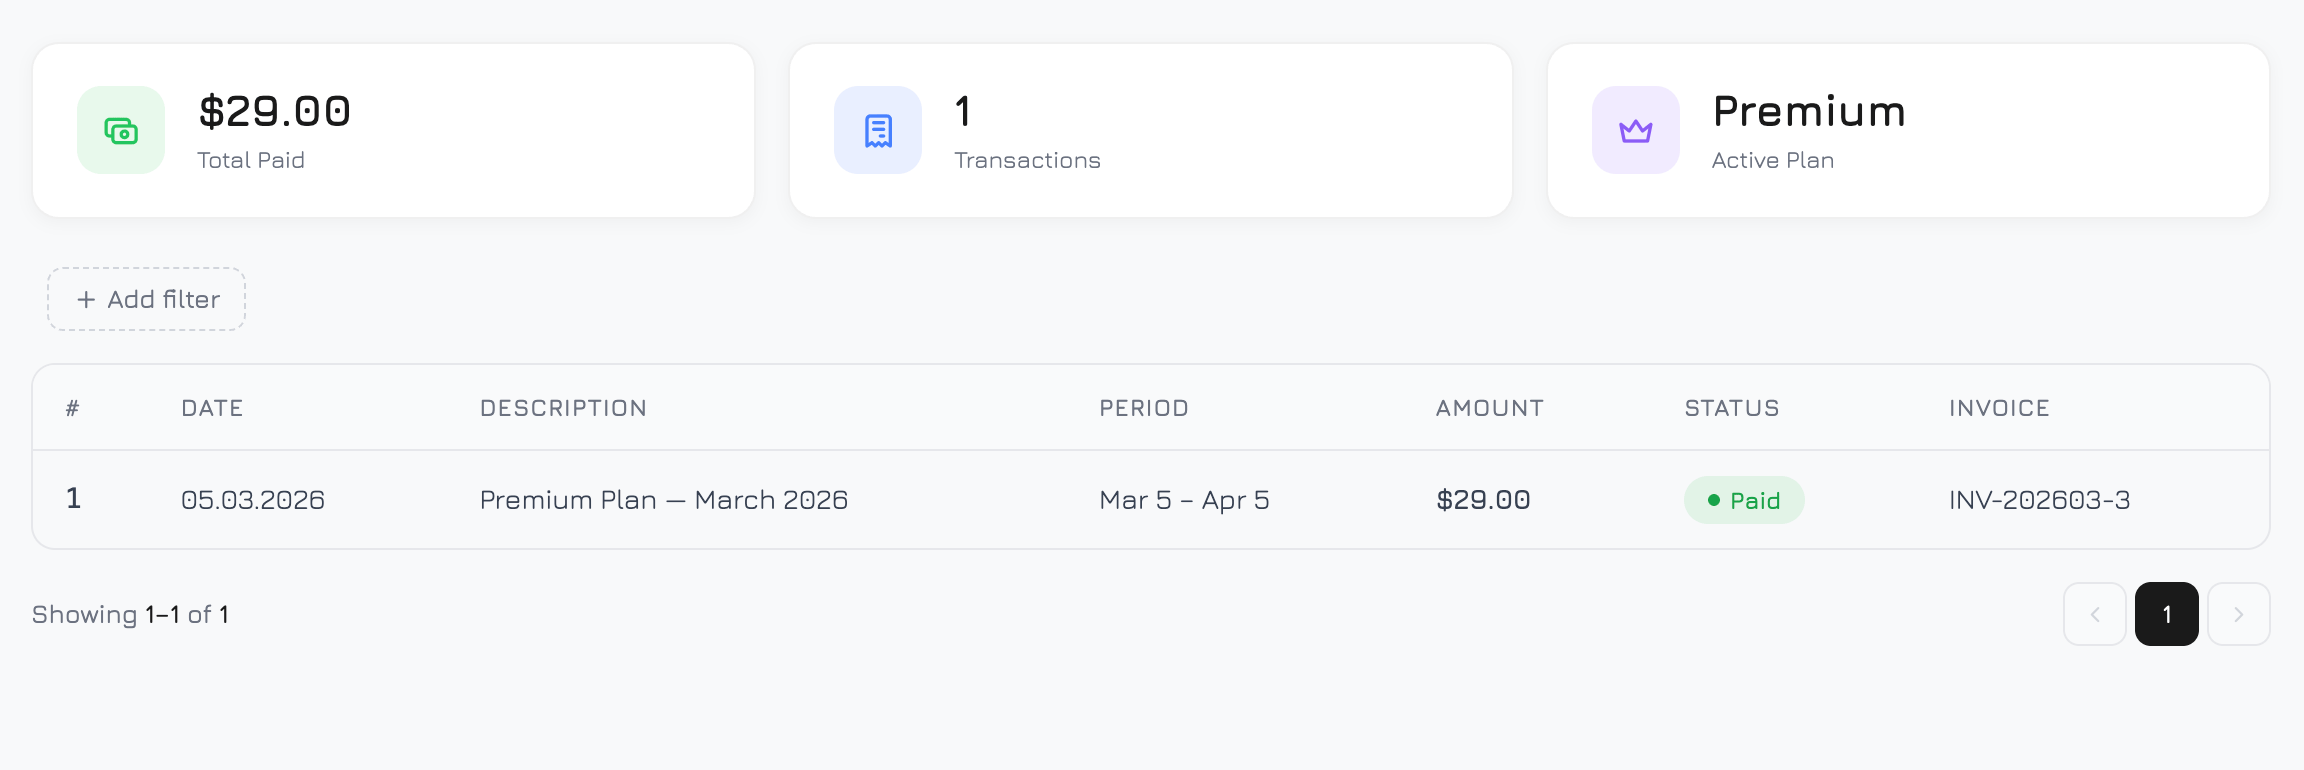
Invoices
All payment history is available in Billing → Invoices.
Summary Cards
Three cards at the top of the page provide a quick financial overview:
| Card | Icon | Description |
|---|
| Total Paid | Cash (green) | Total amount paid across all transactions, formatted as USD |
| Transactions | Receipt (blue) | Total number of billing transactions |
| Active Plan | Crown (purple) | Your current subscription plan name |
Invoice Table
A filterable, paginated table of every billing transaction. Click + Filter to add filter chips:
| Filter | Options |
|---|
| Date From | Calendar date picker |
| Date To | Calendar date picker |
| Type | Subscription, Pack Purchase, Plan Change |
| Status | Paid, Pending, Failed, Refunded |
| Column | Description | Format |
|---|
| # | Row number | Sequential index on current page |
| Date | Payment date | DD.MM.YYYY |
| Description | What was paid for | Plan name, pack name, or change description |
| Period | Billing period covered | "Mar 15 – Apr 15" or — for one-time purchases |
| Amount | Payment amount | Pre-formatted USD value (e.g., $29.00) |
| Status | Payment status | Color-coded badge with dot indicator |
| PDF | Invoice document | PDF download link or hosted invoice link |
| Status | Color | Dot |
|---|
| Paid | Green | Green dot |
| Pending | Amber | Amber dot |
| Failed | Red | Red dot |
| Refunded | Grey | Grey dot |
Upgrade Modal
When you attempt to perform an action that exceeds your plan limits — such as creating a new agent, starting a conversation, or sending a message when tokens are exhausted — an upgrade modal appears automatically.
The modal shows:
- Resource icon and name — which limit was hit (e.g., “AI Agents”, “Standard Tokens”)
- Current usage — how much you’ve used vs. your plan limit (e.g., “5 / 5 agents”)
- Your plan name — so you know which plan you’re on
- Buy a Pack button — shown for token, storage, and voice resources, links to the Packs page
- Upgrade Plan button — links to the Pricing page
The upgrade modal also triggers when API requests return a 429 (rate limit) or 403 (quota exceeded) response, ensuring you’re always informed about billing limits regardless of where the interaction originated.